Submit a new object
Muradora includes a submission wizard to facilitate the process of creating new digital object. Users with appropriate permissions will see "Submit" tab on the horizontal navigation bar. Click on this tab to start submitting a new object.
The submission wizard is divided into 3 easy to follow steps:
- Select parent collection and object type.
- Upload files or specify external references.
- Enter metadata and finalise submission.
Step 1
The purpose of this step is to select appropriate object type (documents, images or videos...) and a parent collection that the newly created object will reside in.

To select a parent collection, click on "Select collection" link which opens a new window containing all the top level collections available in the repository. Click on the name of the collection to navigation to its sub-collection. You can also search for collections by their names using the form highlighted in the following screenshot. Once navigated to the appropriate collection, click on "Select" link next to its name to select the collection.
Click on "Next" button to go to the next step.

In this step, you also need to specify the type of the object you are trying to submit (journal, image, book or audio..) and metadata editor used for editing its metadata. Metadata editor is essentially the form to enter information about the object you want to create such as author, title, publisher and contributor. Muradora currently supports Dublin Core and MODS metadata. Almost any type of metadata that produces XML document can be supported using the XForms platform provided by Muradora.
Step 2
In step 2, you will be able to upload multiple files or specify externally referenced resources. However, you cannot do both at same time. This limitation might be removed in the next version of Muradora.
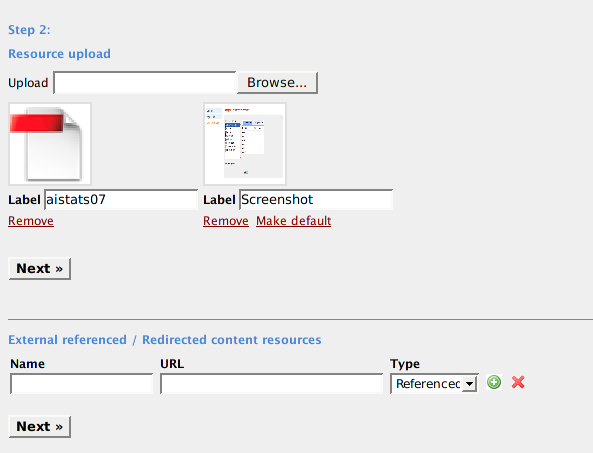
To upload a new file, click on Browse button and select the appropriate file in your file browser. Once selected, the file will be automatically uploaded to Muradora. Depending on the size of the file you are trying to upload, it might take some time to complete. Muradora will display an animated image indicating that upload is in progress. Once the file is successfully uploaded to Muradora, a thumbnail (if the uploaded file is an image) or a generic image will be displayed to end user. You can use the textbox below each of the uploaded file to edit its label/name. In case you do not want to use a particular uploaded file, you can simply tell Muradora to delete it by click on "Delete" link. You also have the option to specify the default thumbnail for the newly created object by clicking on appropriate "Make default" link. The default thumbnail is the small image that will be displayed with the object's name in search results or in browse view. Click on the next button to go to the next step.
Fedora repository has the notions of externally referenced and externally redirected resources. Muradora allows you to specify multiple resources of these types. Simply enter the resource's name and address in "Name" and "URL" textbox. You also need to specify the resources type using "Type" drop down list. To add a new resource, click on the "+" green image. Click on the "X" red image to delete a resource. Click on the next button to go to the next step.
Step 3
Depending on the metadata editor you selected in the first step, Muradora will present you with a suitable form to enter information about the object. For example, in the next screenshot, we are using Dublin Core metadata input form. After you finish entering information, click on "Submit" button to finalise the submission process. If the object is successfully submitted you will be redirected to the object's view page.

Publish
Once a new object is created, it is only visible in search results if it is published. Click on "Publish" tab to view the list of objects that you are allowed to publish. Object s can be published individually by clicking on "publish" link. You can also publish multile objects at the same time by selecting appropriate checkboxes and press "Publish marked resources".
