|
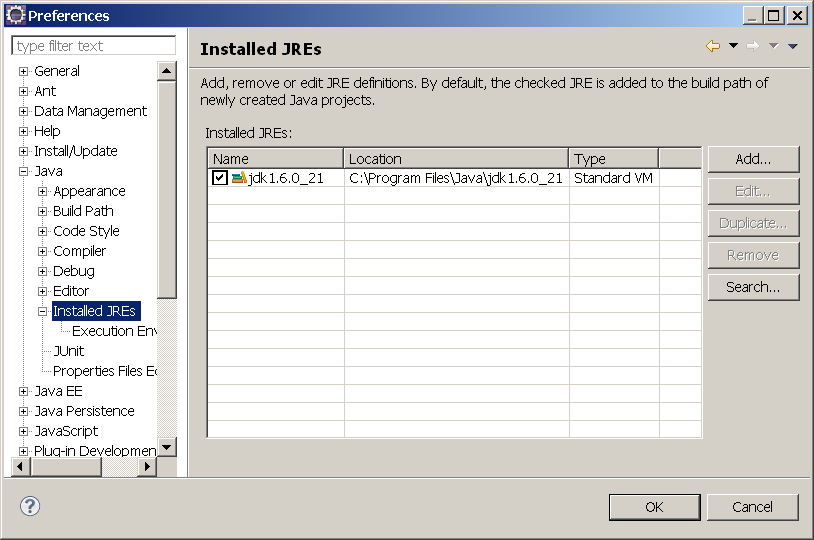
Eclipse Helios Eclipse Helios is now available. This document is in the process of being updated as the new release is tested. There is a known problem Eclipse is a popular integrated development environment (IDE) which is used by many developers for the Fedora Repository service, clients and other related services. You do not need to build the Fedora Repository from source in Eclipse in order to build your own projects though it may be convenient. You may build the Fedora Repository from the command line and just use Eclipse for editing and debugging. The options are too numerous for one article so we will describe just a few popular configurations to get you started. The current Fedora Repository trunk (Fedora 3.3 and greater) uses Apache Maven This article uses the Fedora Repository service as an example. It is important that you read the Installation and Configuration Guide first. It contains a significant amount of information about the Fedora Repository and building it from source which is not repeated here. On this page: ">Installing the JDKFedora is only tested with the Sun JDK though others may work well or even be required for a particular operational environments such as specific application servers. Eclipse has a very sophisticated structure which supports the installation and use of multiple Java compilers and run time environments. Initially, we recommend installing the Sun JDK to get success and then you may explore other options. The Oracle/Sun JDK may be obtained from here It is also convenient for you install the JDK outside "Program Files" if you are developing in Microsoft Windows, using a directory with no spaces in the name. Eclipse and the Fedora command-line Maven-based build tools will work with proper set-up but you will have less trouble if you avoid directories with spaces in their names. Also, very long directory structures may be found in Eclipse projects and generally don't cause problems with Eclipse, but may cause problems with other products in Windows XP. So having a top-level Install EclipseDownload and install Eclipse Select the JDK and Set the Compiler ComplianceMake sure Java 1.6 appears as an installed JRE and that it is the default JRE for the project. A) Use the Eclipse Menu: Window -> Preferences -> Java -> Installed JREs. Despite the name of the menu item it is highly recommended that you install JDKs. Use of a JDK is required for the M2Eclipse Maven plug-in described below. Use the Add button to add the Java 1.6 JDK if it is not already installed. Check the Java 1.6 JDK and press
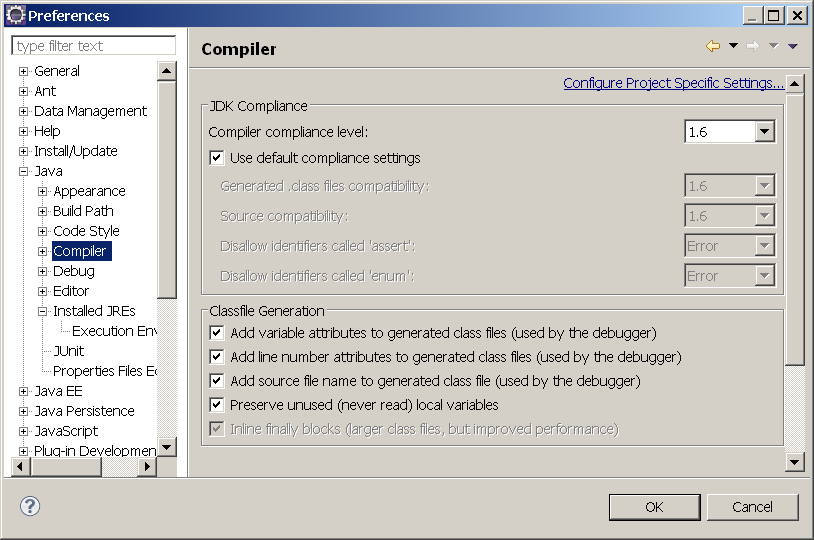
B) Use the Eclipse Menu: Window -> Preferences -> Java -> Compiler. Select
Configure MavenThe M2Eclipse plug-in includes an embedded Maven. Optionally you can also install Maven on the command-line. Regardless, you must have a local Maven repository to cache dependencies and work products from the builds. A command-line Maven can be obtained from http://maven.apache.org/ Duraspace provides a Maven repository for Fedora dependencies which cannot be obtained from Maven Central or common public Maven repositories. You do not have to do anything to use this repository, everything is handled by Maven from specifications in the POMs. Maven will look for the repository in several standard locations. However, you can make things easier if you create a setting file. Settings may be obtained globally from the Maven installation or in a settings file associated with your user. The user settings file varies depending on the operating system (in Windows - "Documents and Settings\username\.m2\settings.xml", in Linux - "home/username/.m2/settings.xml"). The global setting file is usually in <maven-install>/conf. If you install a command-line Maven you may accidentally wind up with two local Maven repositories. Just make sure everything points to the same local repository. If you have problems may help to set the environment variable M2_HOME to <maven-install> and put <M2_HOME>/bin on your path. Example user settings.xml <settings xmlns="http://maven.apache.org/SETTINGS/1.0.0"
xmlns:xsi="http://www.w3.org/2001/XMLSchema-instance"
xsi:schemaLocation="http://maven.apache.org/SETTINGS/1.0.0
http://maven.apache.org/xsd/settings-1.0.0.xsd">
<localRepository>d:/m2/repository</localRepository>
</settings>
Example global settings.xml <?xml version="1.0" encoding="UTF-8"?>
<!--
Licensed to the Apache Software Foundation (ASF) under one
or more contributor license agreements. See the NOTICE file
distributed with this work for additional information
regarding copyright ownership. The ASF licenses this file
to you under the Apache License, Version 2.0 (the
"License"); you may not use this file except in compliance
with the License. You may obtain a copy of the License at
http://www.apache.org/licenses/LICENSE-2.0
Unless required by applicable law or agreed to in writing,
software distributed under the License is distributed on an
"AS IS" BASIS, WITHOUT WARRANTIES OR CONDITIONS OF ANY
KIND, either express or implied. See the License for the
specific language governing permissions and limitations
under the License.
-->
<!--
| This is the configuration file for Maven. It can be specified at two levels:
|
| 1. User Level. This settings.xml file provides configuration for a single user,
| and is normally provided in ${user.home}/.m2/settings.xml.
|
| NOTE: This location can be overridden with the CLI option:
|
| -s /path/to/user/settings.xml
|
| 2. Global Level. This settings.xml file provides configuration for all Maven
| users on a machine (assuming they're all using the same Maven
| installation). It's normally provided in
| ${maven.home}/conf/settings.xml.
|
| NOTE: This location can be overridden with the CLI option:
|
| -gs /path/to/global/settings.xml
|
| The sections in this sample file are intended to give you a running start at
| getting the most out of your Maven installation. Where appropriate, the default
| values (values used when the setting is not specified) are provided.
|
|-->
<settings xmlns="http://maven.apache.org/SETTINGS/1.0.0"
xmlns:xsi="http://www.w3.org/2001/XMLSchema-instance"
xsi:schemaLocation="http://maven.apache.org/SETTINGS/1.0.0 http://maven.apache.org/xsd/settings-1.0.0.xsd">
<!-- localRepository
| The path to the local repository maven will use to store artifacts.
|
| Default: ~/.m2/repository
<localRepository>/path/to/local/repo</localRepository>
-->
<localRepository>d:/m2/repository</localRepository>
<!-- interactiveMode
| This will determine whether maven prompts you when it needs input. If set to false,
| maven will use a sensible default value, perhaps based on some other setting, for
| the parameter in question.
|
| Default: true
<interactiveMode>true</interactiveMode>
-->
<!-- offline
| Determines whether maven should attempt to connect to the network when executing a build.
| This will have an effect on artifact downloads, artifact deployment, and others.
|
| Default: false
<offline>false</offline>
-->
<!-- pluginGroups
| This is a list of additional group identifiers that will be searched when resolving plugins by their prefix, i.e.
| when invoking a command line like "mvn prefix:goal". Maven will automatically add the group identifiers
| "org.apache.maven.plugins" and "org.codehaus.mojo" if these are not already contained in the list.
|-->
<pluginGroups>
<!-- pluginGroup
| Specifies a further group identifier to use for plugin lookup.
<pluginGroup>com.your.plugins</pluginGroup>
-->
</pluginGroups>
<!-- proxies
| This is a list of proxies which can be used on this machine to connect to the network.
| Unless otherwise specified (by system property or command-line switch), the first proxy
| specification in this list marked as active will be used.
|-->
<proxies>
<!-- proxy
| Specification for one proxy, to be used in connecting to the network.
|
<proxy>
<id>optional</id>
<active>true</active>
<protocol>http</protocol>
<username>proxyuser</username>
<password>proxypass</password>
<host>proxy.host.net</host>
<port>80</port>
<nonProxyHosts>local.net|some.host.com</nonProxyHosts>
</proxy>
-->
</proxies>
<!-- servers
| This is a list of authentication profiles, keyed by the server-id used within the system.
| Authentication profiles can be used whenever maven must make a connection to a remote server.
|-->
<servers>
<!-- server
| Specifies the authentication information to use when connecting to a particular server, identified by
| a unique name within the system (referred to by the 'id' attribute below).
|
| NOTE: You should either specify username/password OR privateKey/passphrase, since these pairings are
| used together.
|
<server>
<id>deploymentRepo</id>
<username>repouser</username>
<password>repopwd</password>
</server>
-->
<!-- Another sample, using keys to authenticate.
<server>
<id>siteServer</id>
<privateKey>/path/to/private/key</privateKey>
<passphrase>optional; leave empty if not used.</passphrase>
</server>
-->
</servers>
<!-- mirrors
| This is a list of mirrors to be used in downloading artifacts from remote repositories.
|
| It works like this: a POM may declare a repository to use in resolving certain artifacts.
| However, this repository may have problems with heavy traffic at times, so people have mirrored
| it to several places.
|
| That repository definition will have a unique id, so we can create a mirror reference for that
| repository, to be used as an alternate download site. The mirror site will be the preferred
| server for that repository.
|-->
<mirrors>
<!-- mirror
| Specifies a repository mirror site to use instead of a given repository. The repository that
| this mirror serves has an ID that matches the mirrorOf element of this mirror. IDs are used
| for inheritance and direct lookup purposes, and must be unique across the set of mirrors.
|
<mirror>
<id>mirrorId</id>
<mirrorOf>repositoryId</mirrorOf>
<name>Human Readable Name for this Mirror.</name>
<url>http://my.repository.com/repo/path</url>
</mirror>
-->
</mirrors>
<!-- profiles
| This is a list of profiles which can be activated in a variety of ways, and which can modify
| the build process. Profiles provided in the settings.xml are intended to provide local machine-
| specific paths and repository locations which allow the build to work in the local environment.
|
| For example, if you have an integration testing plugin - like cactus - that needs to know where
| your Tomcat instance is installed, you can provide a variable here such that the variable is
| dereferenced during the build process to configure the cactus plugin.
|
| As noted above, profiles can be activated in a variety of ways. One way - the activeProfiles
| section of this document (settings.xml) - will be discussed later. Another way essentially
| relies on the detection of a system property, either matching a particular value for the property,
| or merely testing its existence. Profiles can also be activated by JDK version prefix, where a
| value of '1.4' might activate a profile when the build is executed on a JDK version of '1.4.2_07'.
| Finally, the list of active profiles can be specified directly from the command line.
|
| NOTE: For profiles defined in the settings.xml, you are restricted to specifying only artifact
| repositories, plugin repositories, and free-form properties to be used as configuration
| variables for plugins in the POM.
|
|-->
<profiles>
<!-- profile
| Specifies a set of introductions to the build process, to be activated using one or more of the
| mechanisms described above. For inheritance purposes, and to activate profiles via <activatedProfiles/>
| or the command line, profiles have to have an ID that is unique.
|
| An encouraged best practice for profile identification is to use a consistent naming convention
| for profiles, such as 'env-dev', 'env-test', 'env-production', 'user-jdcasey', 'user-brett', etc.
| This will make it more intuitive to understand what the set of introduced profiles is attempting
| to accomplish, particularly when you only have a list of profile id's for debug.
|
| This profile example uses the JDK version to trigger activation, and provides a JDK-specific repo.
<profile>
<id>jdk-1.4</id>
<activation>
<jdk>1.4</jdk>
</activation>
<repositories>
<repository>
<id>jdk14</id>
<name>Repository for JDK 1.4 builds</name>
<url>http://www.myhost.com/maven/jdk14</url>
<layout>default</layout>
<snapshotPolicy>always</snapshotPolicy>
</repository>
</repositories>
</profile>
-->
<!--
| Here is another profile, activated by the system property 'target-env' with a value of 'dev',
| which provides a specific path to the Tomcat instance. To use this, your plugin configuration
| might hypothetically look like:
|
| ...
| <plugin>
| <groupId>org.myco.myplugins</groupId>
| <artifactId>myplugin</artifactId>
|
| <configuration>
| <tomcatLocation>${tomcatPath}</tomcatLocation>
| </configuration>
| </plugin>
| ...
|
| NOTE: If you just wanted to inject this configuration whenever someone set 'target-env' to
| anything, you could just leave off the <value/> inside the activation-property.
|
<profile>
<id>env-dev</id>
<activation>
<property>
<name>target-env</name>
<value>dev</value>
</property>
</activation>
<properties>
<tomcatPath>/path/to/tomcat/instance</tomcatPath>
</properties>
</profile>
-->
</profiles>
<!-- activeProfiles
| List of profiles that are active for all builds.
|
<activeProfiles>
<activeProfile>alwaysActiveProfile</activeProfile>
<activeProfile>anotherAlwaysActiveProfile</activeProfile>
</activeProfiles>
-->
</settings>
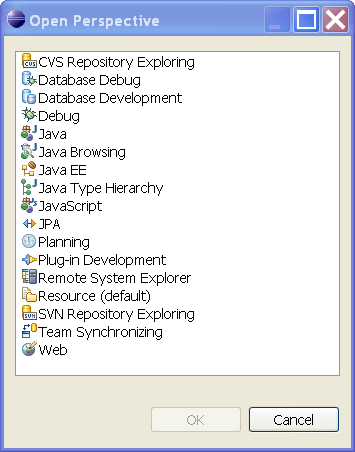
">Install a Subversion ClientIt is recommended that you install a Subversion plug-in, either Subversive A Subversion plug-in is required for a number of functions in the Maven plug-in M2Eclipse described below. Subclipse is provided by the same organization as M2Eclipse however Subversive integration with M2Eclipse is available and in our testing seems to support all common operations. Also, Subversive is the incubated Eclipse plug-in. Many developers use a command-line svn In the following example we show the steps for using Subversive. Installing Subversive is a bit complicated and is changing as it is moving through Eclipse incubation. Once you have installed a Subversion client the following steps may be used to customize your Eclipse settings and to link to the Fedora Subversion repository. Note that some of the steps can only be accomplished after you have downloaded the Fedora sources preferably using Subversion. Don't worry, just get them done before you start editing or building the code. A) Use the Eclipse Menu: Window -> Open Perspective -> Other. Using the
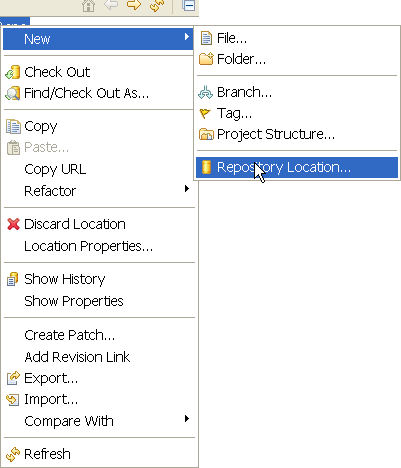
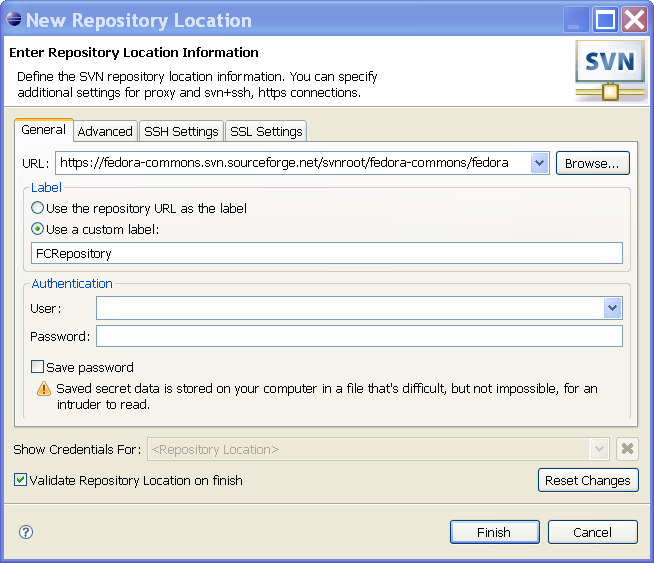
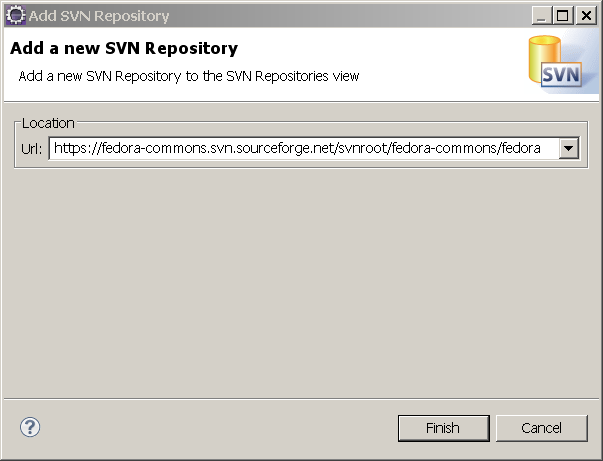
B) Use the right-mouse click menu or the Eclipse Menu: File -> New -> Repository Location. Enter the URL of the Subversion repository (no authentication is needed to download), optionally add a custom label and press
C) Currently the Fedora Repository Project Subversion repository is located at: https://fedora-commons.svn.sourceforge.net/svnroot/fedora-commons/fedora
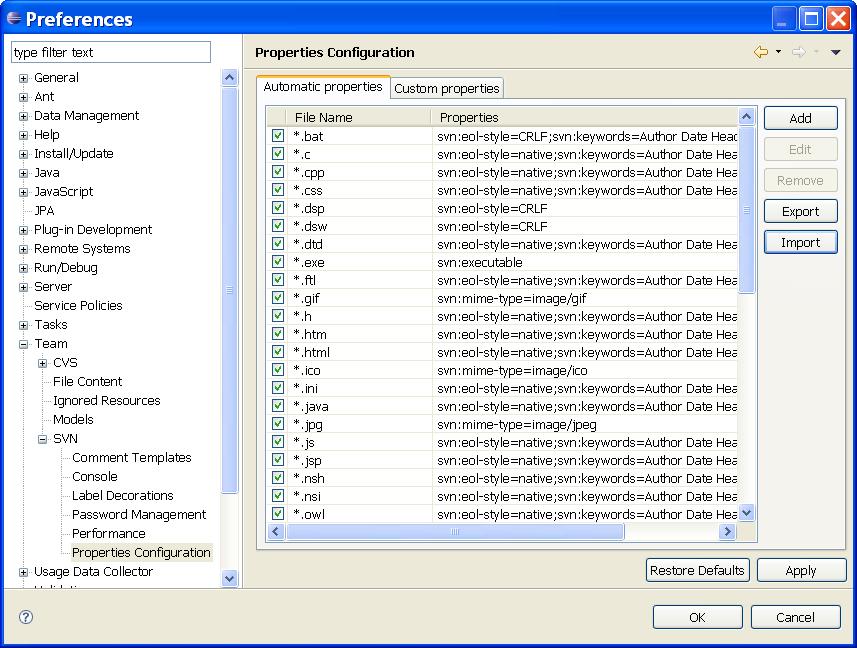
D) Use the Eclipse Menu: Window -> Preferences -> Team -> SVN -> Properties Configuration. On the
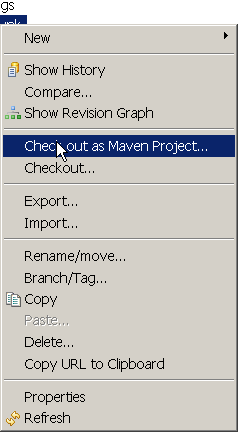
">Install the M2Eclipse Plug-inThere are Eclipse targets built into Maven but the M2Eclipse M2Eclipse will complain if you are not running Eclipse within a JDK are instead using a stand-alone JRE. This will require you to edit the -startup plugins/org.eclipse.equinox.launcher_1.0.200.v20090520.jar --launcher.library plugins/org.eclipse.equinox.launcher.win32.win32.x86_1.0.200.v20090519 -product org.eclipse.epp.package.jee.product --launcher.XXMaxPermSize 256M -showsplash org.eclipse.platform --launcher.XXMaxPermSize 256m -vm c:/java/jdk1.6.0_13/bin/javaw.exe -vmargs -Dosgi.requiredJavaVersion=1.6 -Xms512m -Xmx1024m ">Create an Eclipse ProjectYou must create an Eclipse project for Fedora. The layout of the Fedora Repository source pre-dated the use of Eclipse and does not follow the most natural layout for Eclipse projects. However, Eclipse can be configured to be an effective IDE for development. The ongoing refactoring for Maven is making it more natural to build using Eclipse and enabling the use of Eclipse plug-ins. There are actually too many ways to configure Eclipse for us to document here. We will, however, illustrate one common configuration which you may use (and challenge the community to add more options to this article). Eclipse Friendliness Refactoring of Fedora is underway to improve modularity which will help make Fedora more Eclipse friendly. Code sections have been entirely restructured to build with Maven. However, there is still work to be done in refactoring Fedora to improve modularity. You can follow this ongoing effort now in this Wiki and JIRA. The work at ANT to Maven2 is concluded. There is an easy way to create the Fedora Repository project with M2Eclipse. First you must specify the repository location using the SVN Repository Exploring perspective. Then using the Checkout as Maven Project wizard you will create the
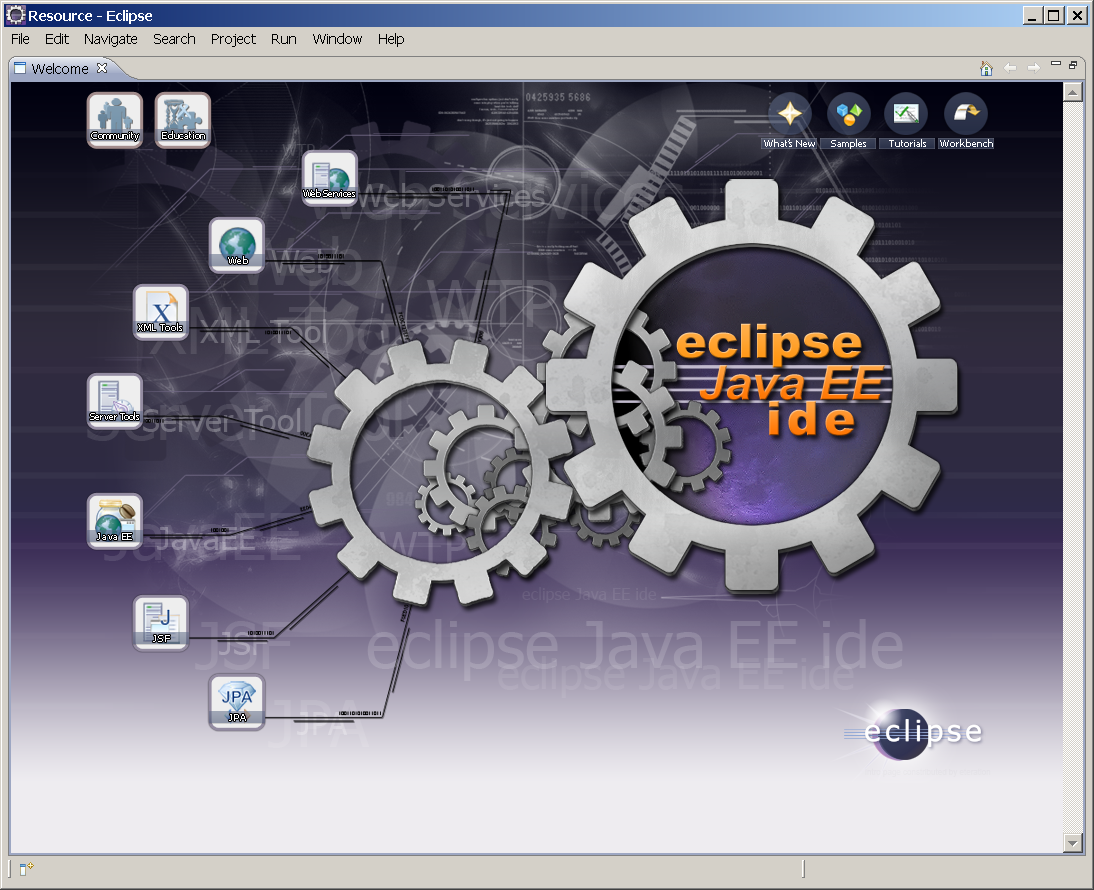
Set Up the Source Repository and Create the Project A) In a fresh install of Eclipse you will see the Welcome screen. It will help if you use the Eclipse Menu: Project -> Build Automatically to uncheck this function. We will use the Maven build for the first build of the repository.
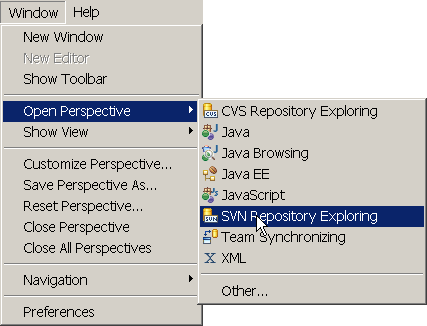
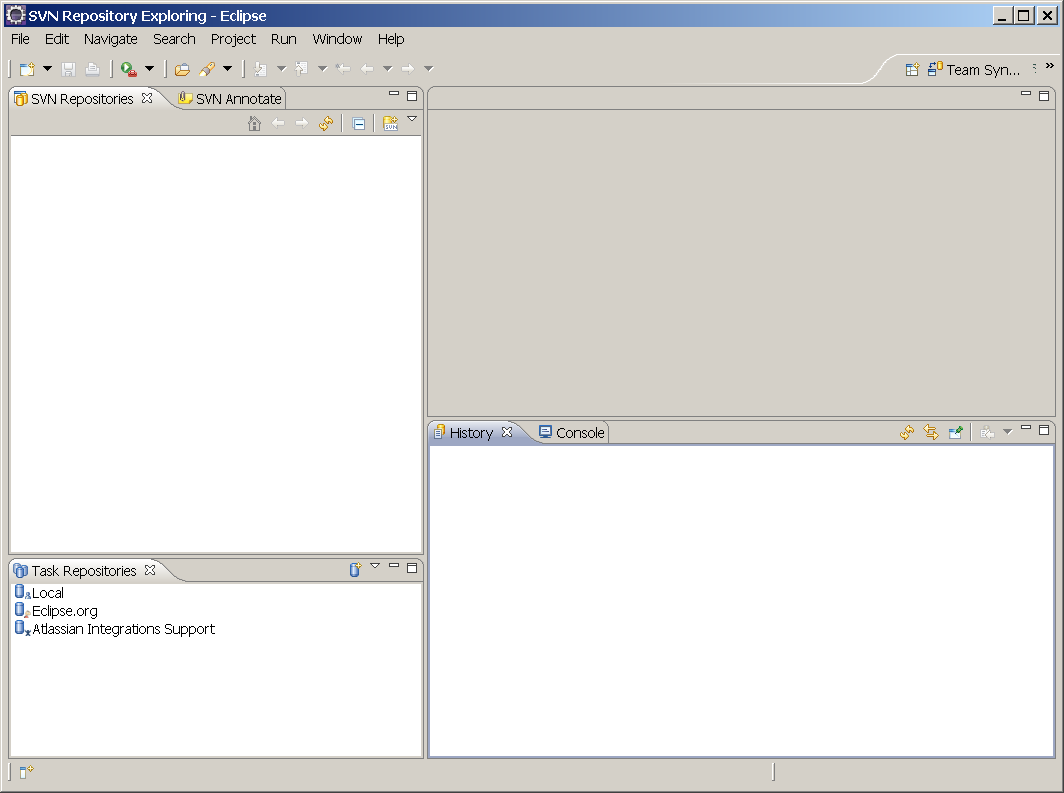
B) Using the Eclipse Menu: Select the Window -> Open Perspective -> SVN Repository Exploring open the perspective.
C) You should see the following perspective:
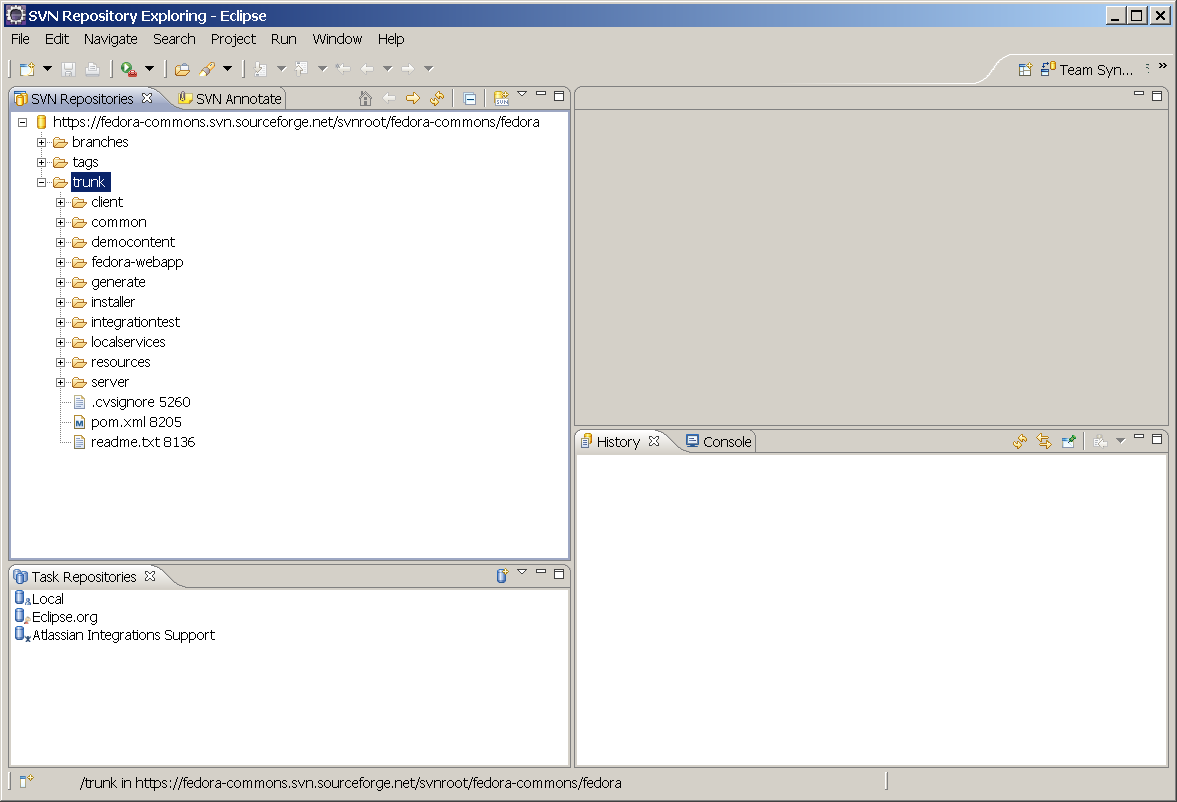
D) Right click in
E) Open the repository and select the trunk or a desired branch. This may take some time depending on the response of the Subversion repository.
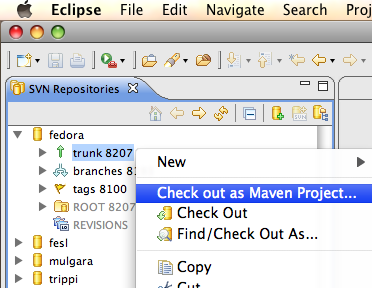
F) Right click to display the SVN menu and select
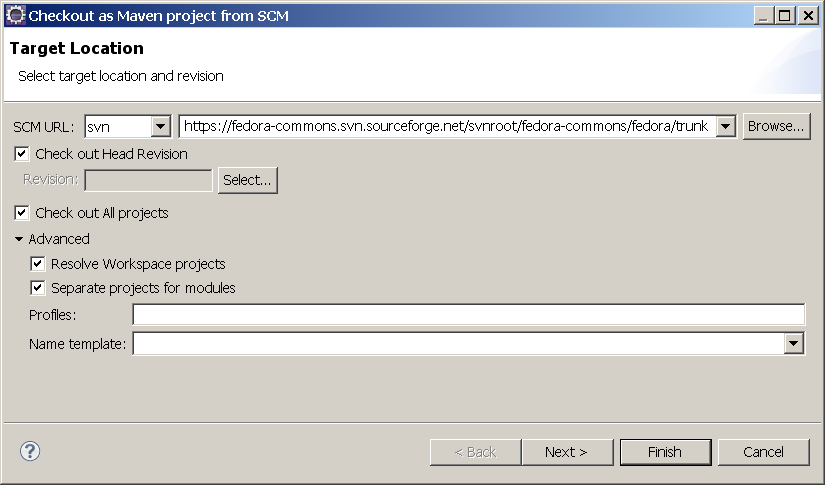
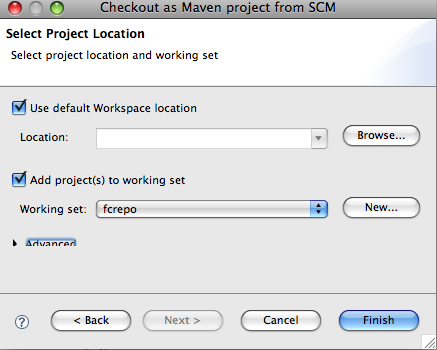
G) Select the target location and revision. If you do not see
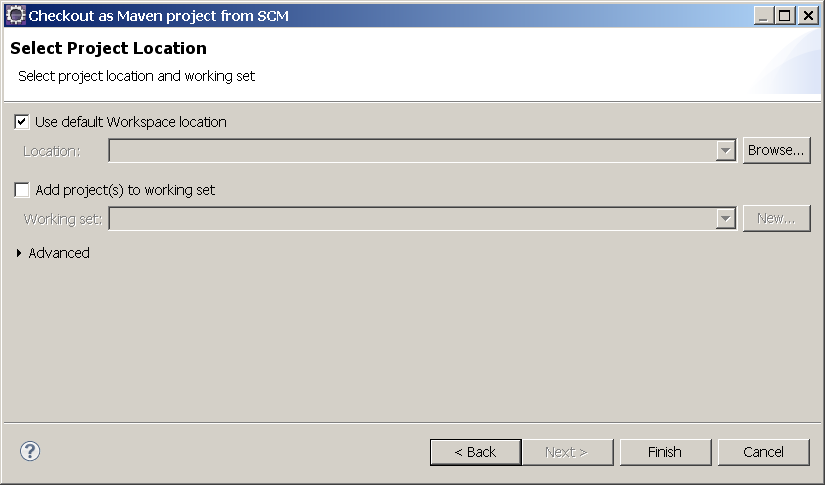
H) Select the
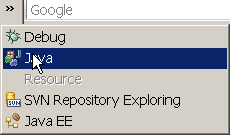
Set up the Maven I) Switch to the Java perspective to set up the run configurations.
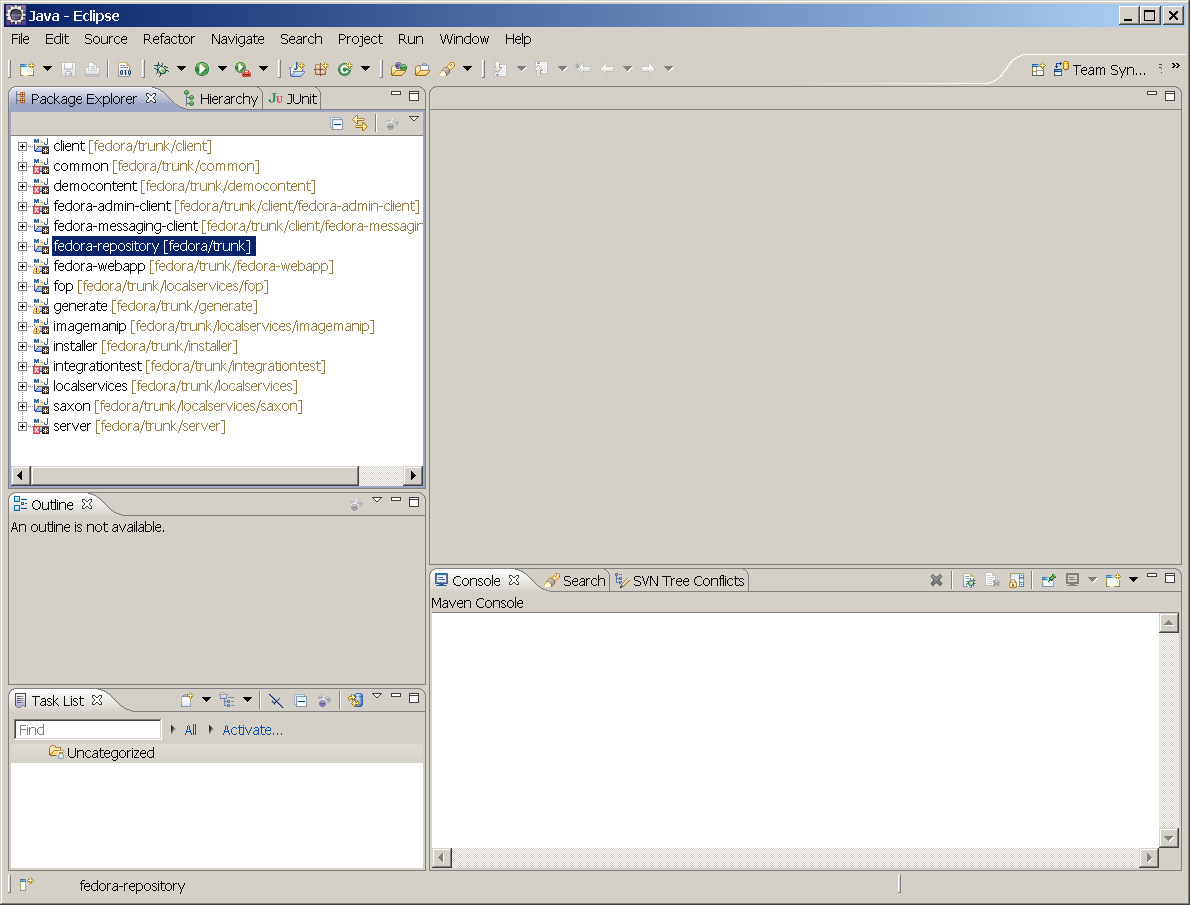
J) You will notice a number of projects, one for each Maven pom. Using this approach lets you make Eclipse settings for each module. The name of the top-level project is automatically set to
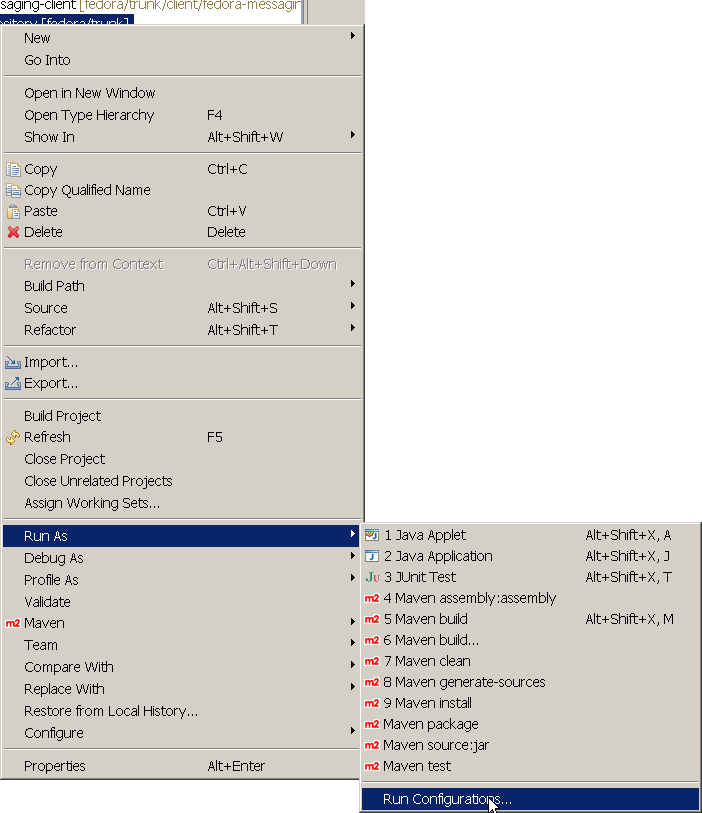
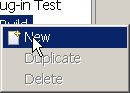
K) There are two ways to create a new
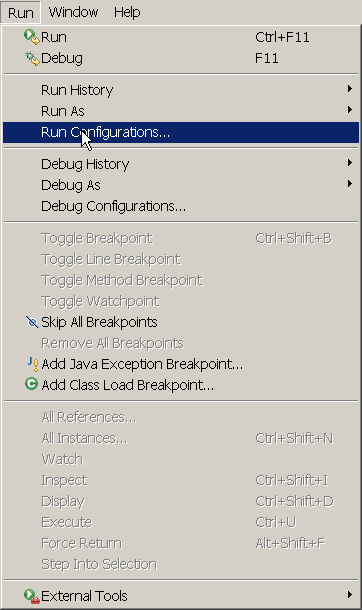
L) Alternately, you can use the Eclipse Menu: Run -> Run Configurations ...
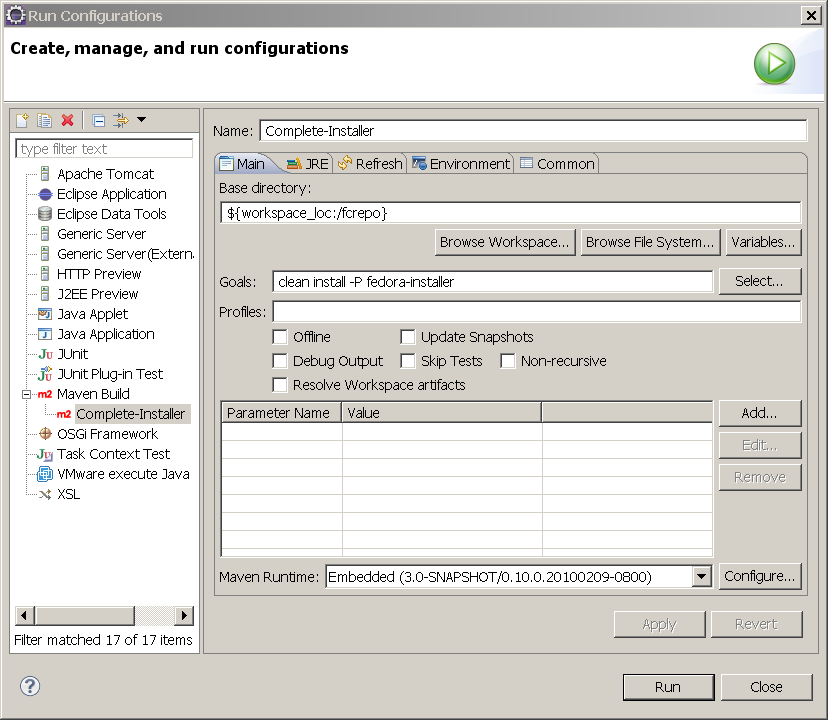
M) Start the Maven
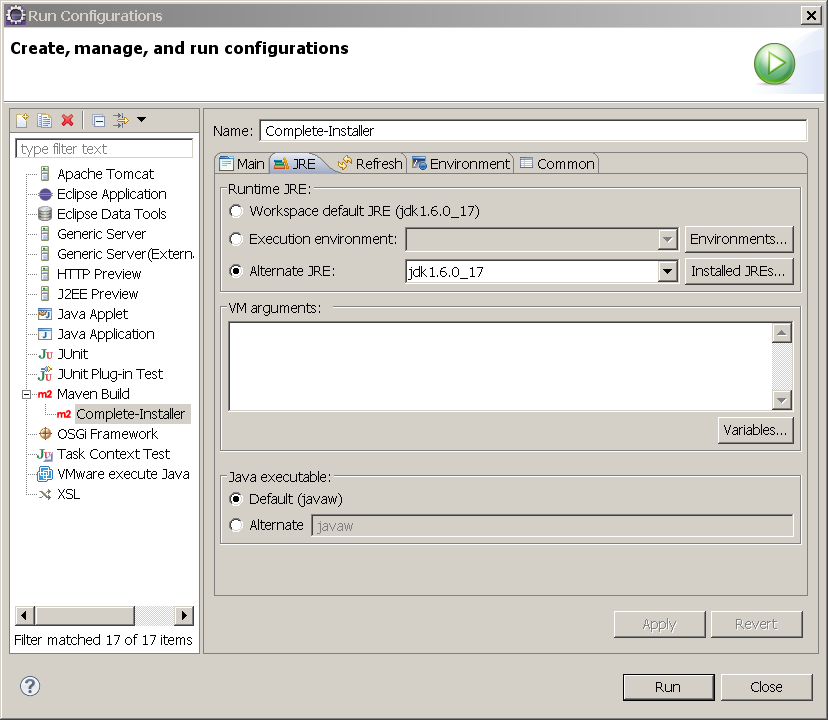
N) You will see the
O) Check that the JRE is set to the Sun Java 1.6 initially. After you have a successful build you may also want to build and test under other JREs. Press the
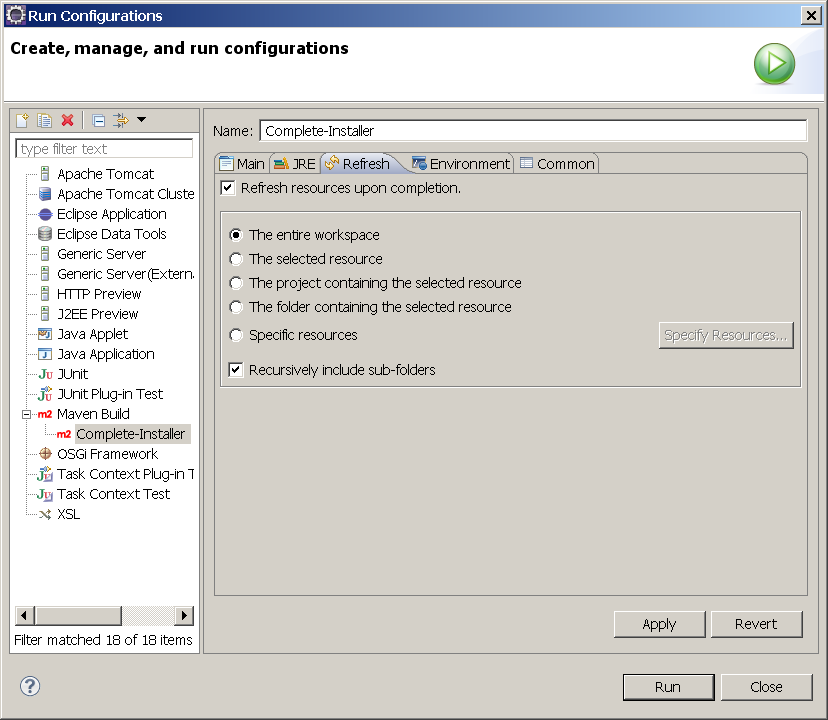
P) Since Fedora uses generated code and Maven will update the project structure it is helpful to refresh the project display after each build. This may not be fully sufficient so you also may need to update select Maven configurations after a build (see Update Maven Projects)
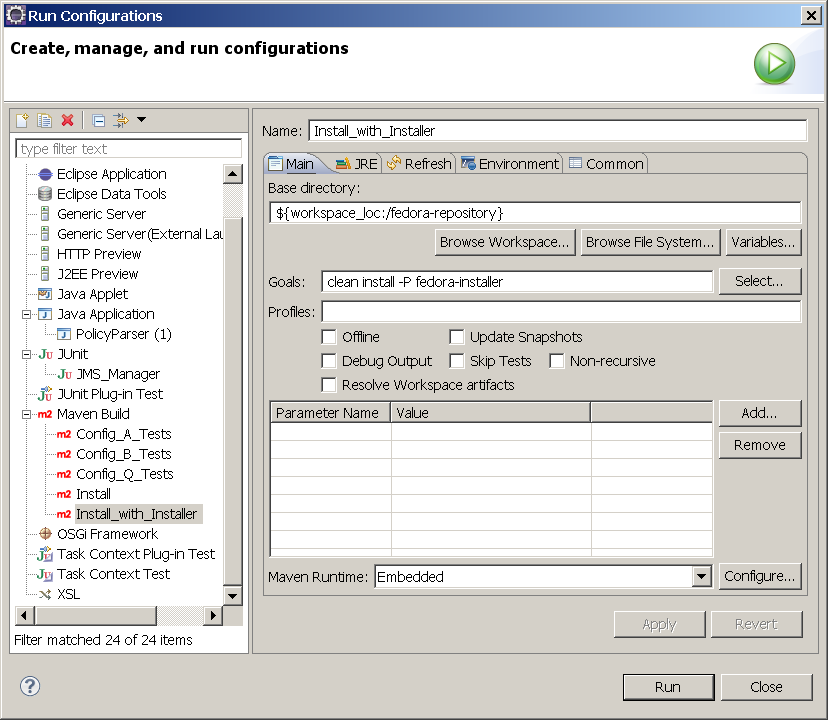
Q) You can add additional Maven run configurations for individual modules, other goals and integration tests. Note for the integration tests you will need a compatibly configured running Fedora Repository.
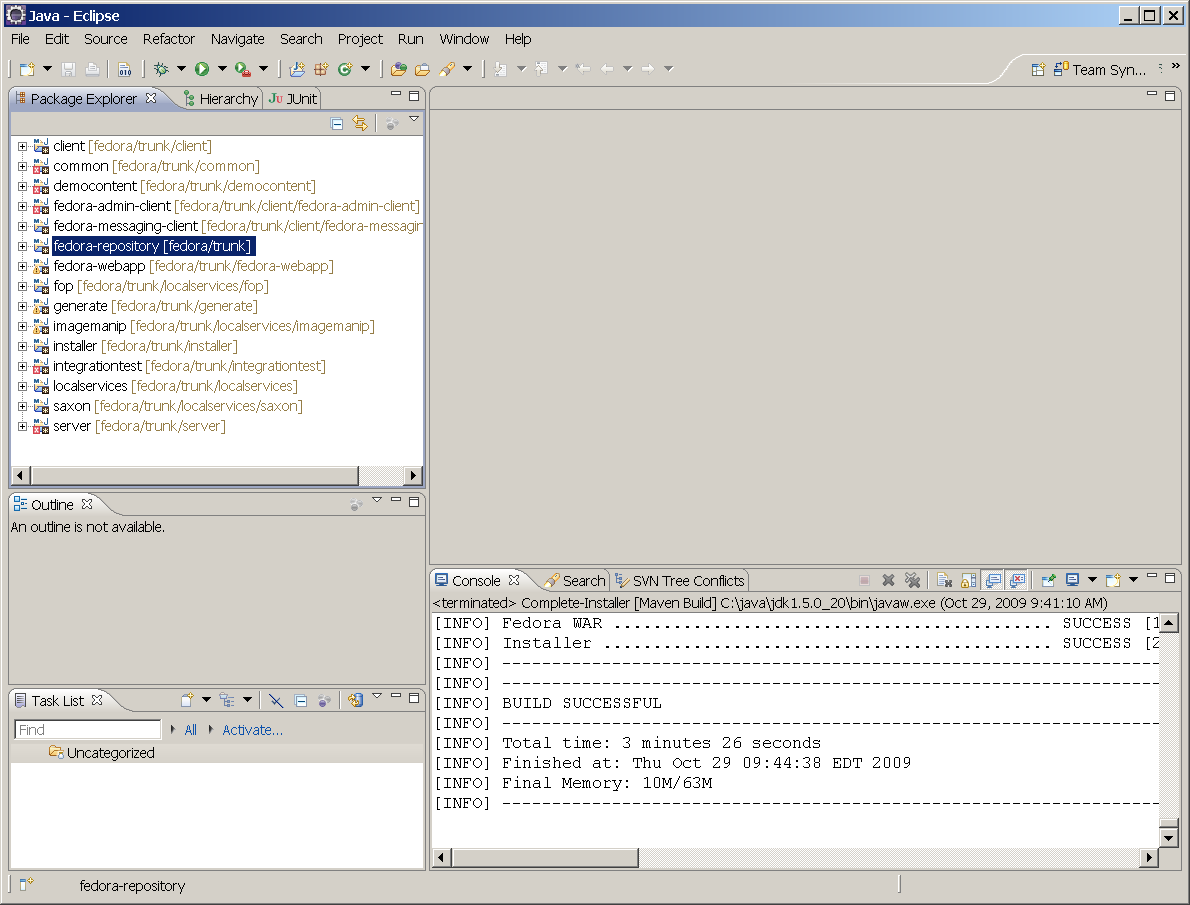
R) Congratulations! You have succeeded in you first Maven build of Fedora.
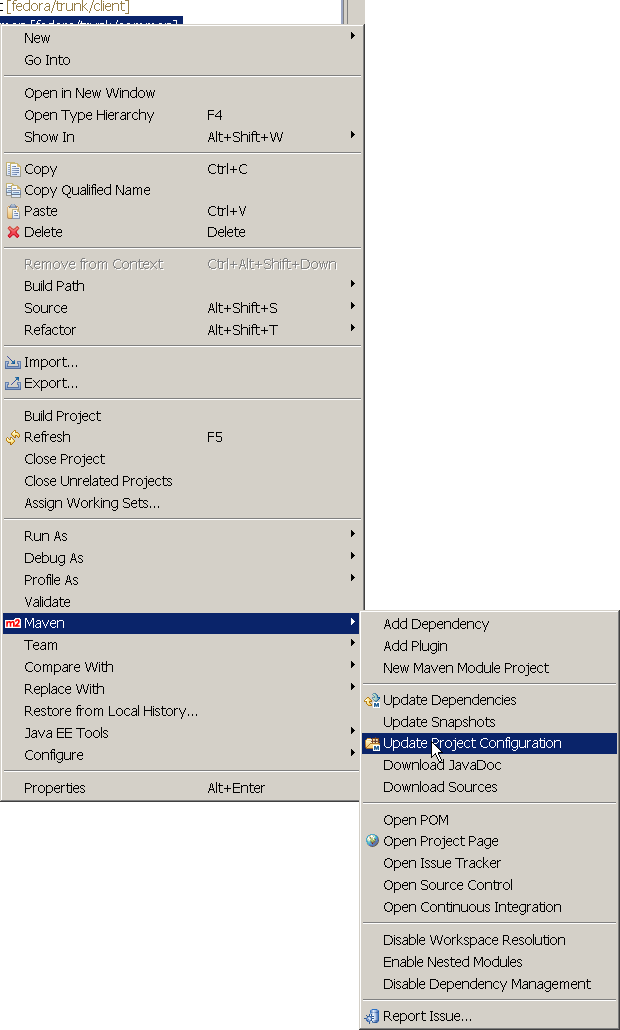
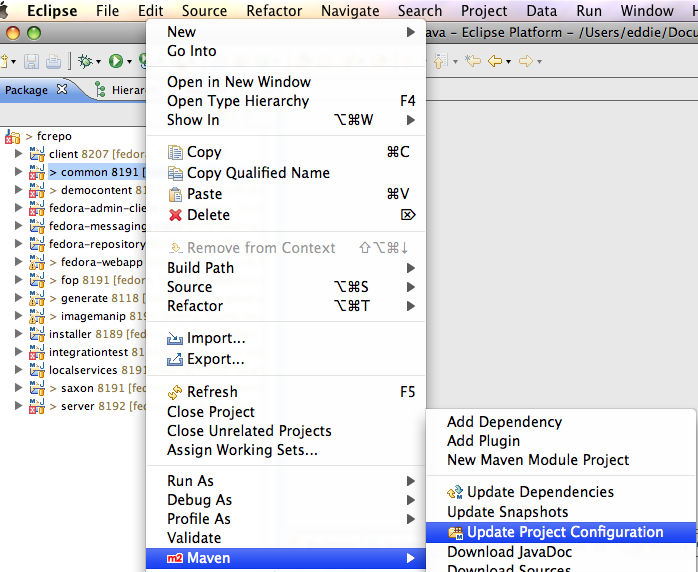
S) Update Maven Configuration Since Fedora uses generated code and Maven will update the project structure it is sometime necessary to manually update selected projects helpful. After the first build and if there are any changes to the common or generated code right click on the
M2Eclipse has a number of options for deploying projects but its handling of hierarchical projects is not complete. Since Fedora is a hierarchical project, it takes a little experience but Eclipse will work properly if permitted. Using the default M2Eclipse configuration is best. It presents subproject POMs as ordinary appropriate (usually Java) Eclipse projects in the workspace separately for each POM. It you use this configuration, the Eclipse functionality will work well. However, you will see both the hierarchical POM projects and the Java Projects in the project explorer views. If you look at the source directly you will see a normal directory hierarchy. M2Eclipse will use information from the POM to create functional Eclipse projects (setting up the .project and .classpath files). You can build equally using Eclipse Maven configuration or from the command line. ">Customize the Workspace SettingsIt is helpful if you customize the workspace settings. The coding standards settings are agreed to by the committers. Contributors are asked to use of the same settings if possible to help facilitate the acceptance process. You will have customize the workspace setting each time you create a new workspace or use the
The next video shows how to prepare the Eclipse IDE for development of the Fedora Repository source code. This video was prepared using Europa but generally will work for Eclipse Galileo and Ganymede also. There are small differences in the IDE versions and their dialogs. These instructions and screen images below were prepared with Ganymede and we are adding Galileo. Unknown macro: {youtube}
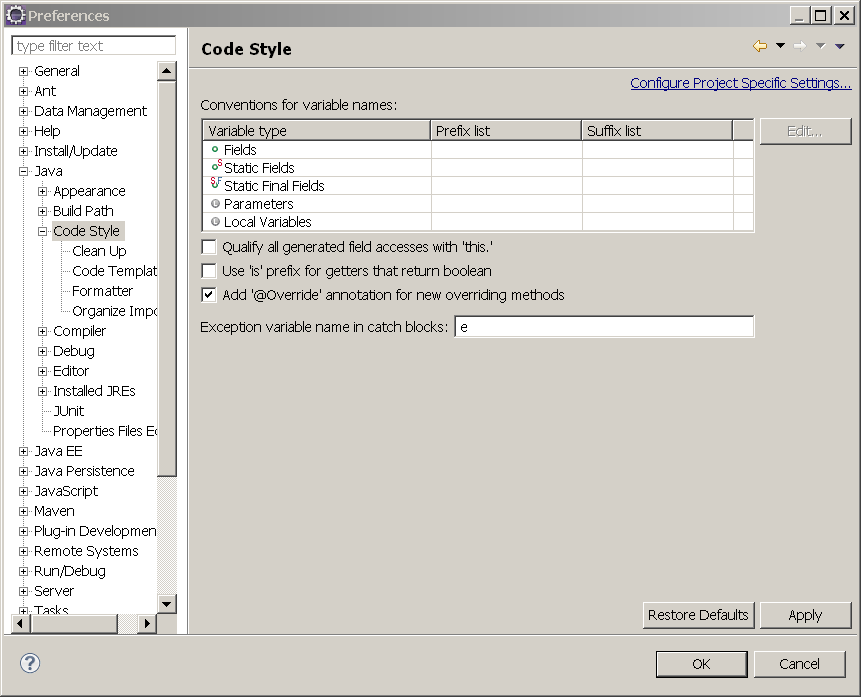
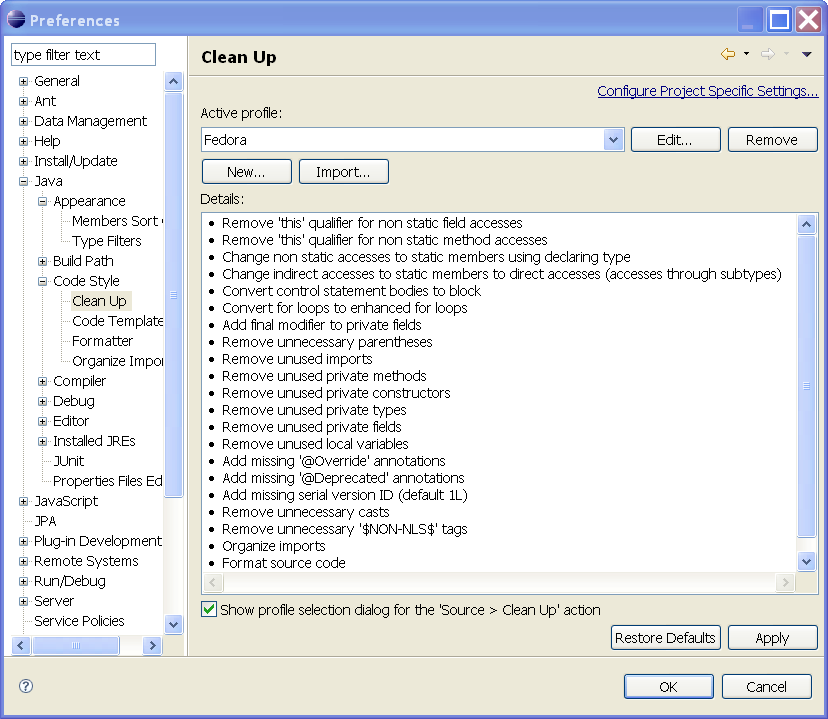
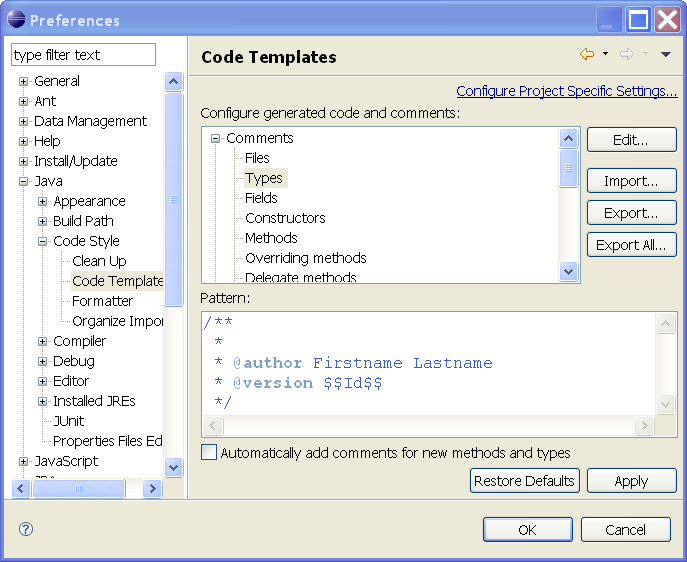
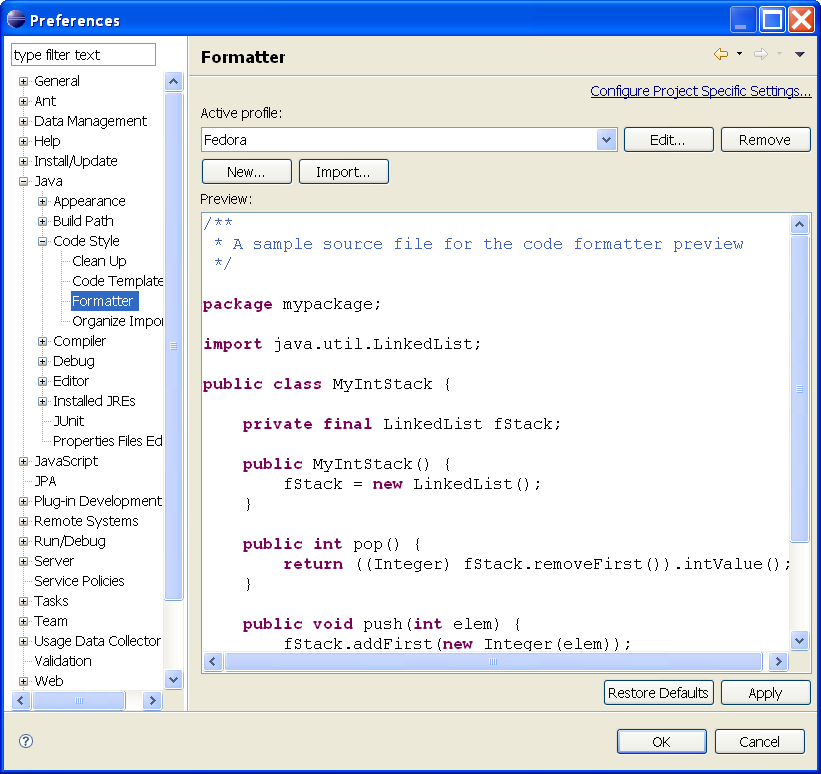
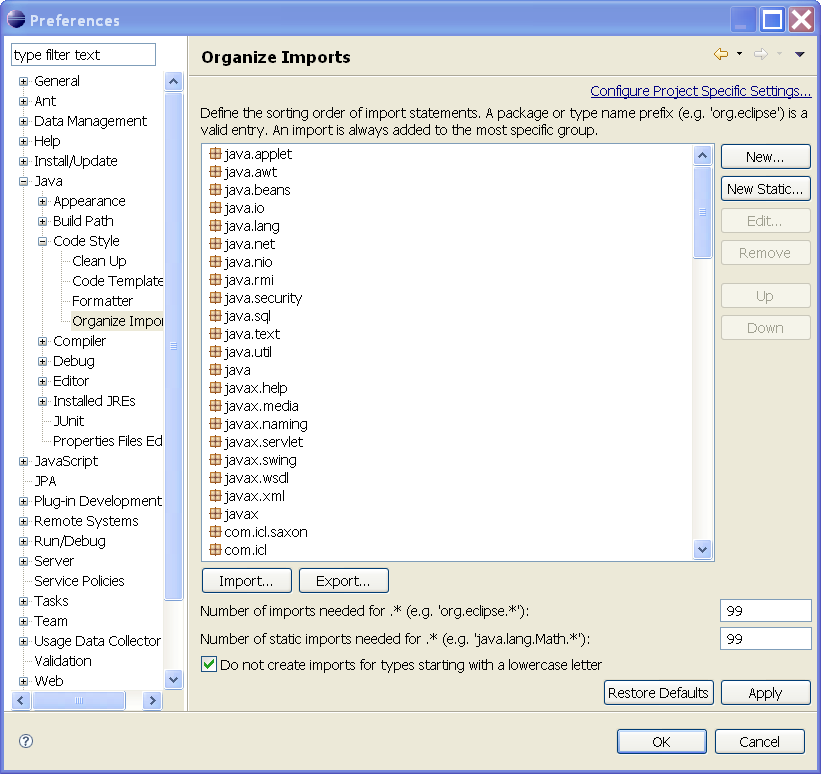
f_daoRXm3lk To set up Eclipse (Helios, Galileo and Ganymede):It is recommended that you use to Eclipse Helios or Galileo (this section has been tested for Helios and Galileo - some small differences will be encountered). You must install Eclipse and a compatible Java JDK prior to beginning this configuration. Also you need to obtain a set of configuration files which are located in the Fedora Repository source. A) Use the Eclipse Menu: Window -> Preferences -> Java -> Code Style Under the top-level
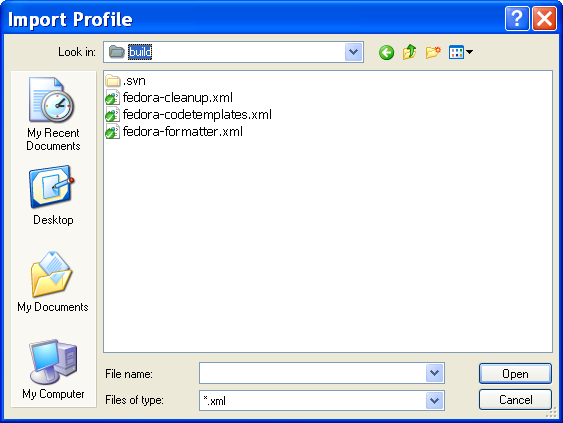
B) Import the configurations files for the
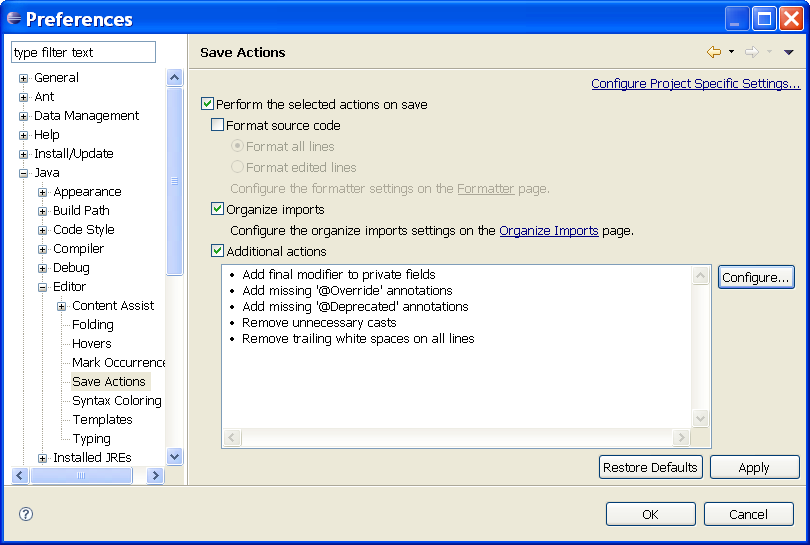
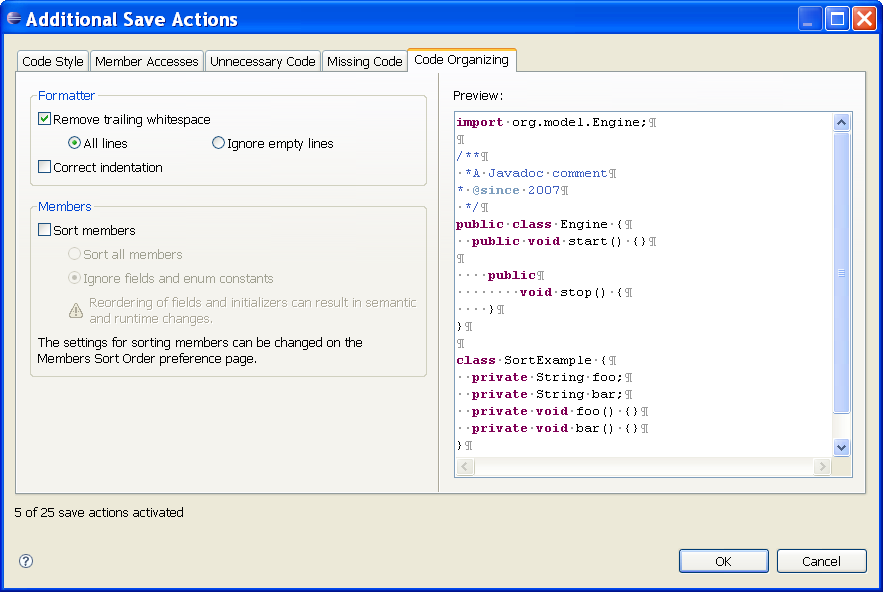
C) Use the Eclipse Menu: Window -> Preferences -> Java -> Editor -> Save Actions
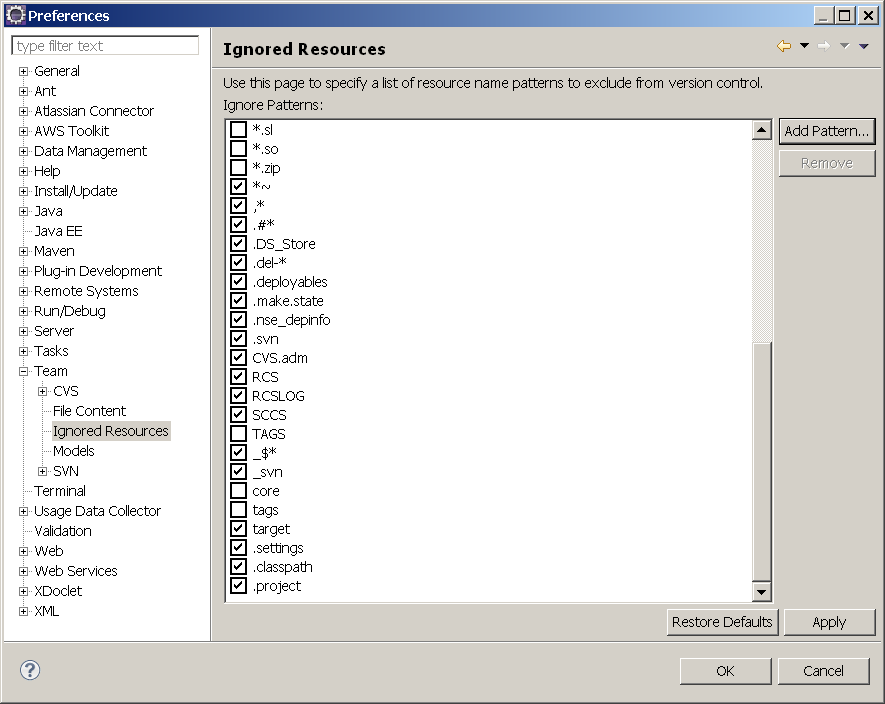
Optional SettingsFedora makes use of WSDL generated Java classes. Without these, Eclipse will complain loudly. There are problems with refreshing in Eclipse that make generated code a source of some difficulties. Also, the Eclipse builder provides substantial feedback such as errors and warnings that can aid in coding but can also be overwhelming. A) Use the Eclipse Menu: Window -> Preferences -> Team -> Ignored Resources Add
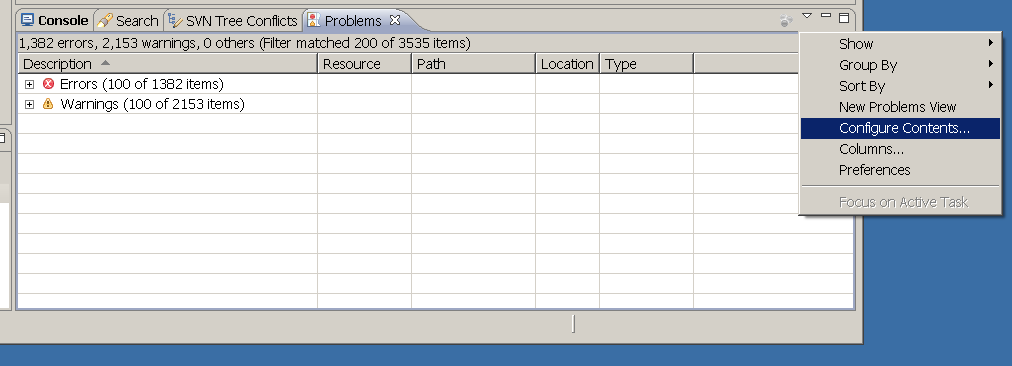
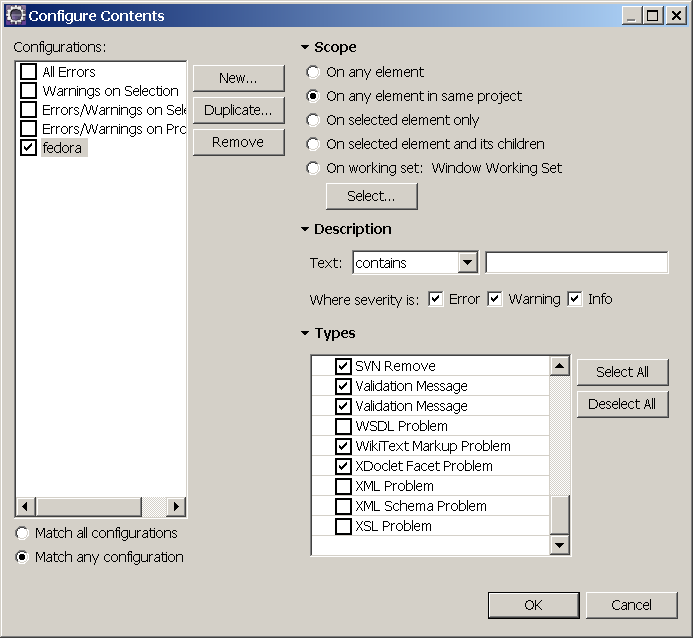
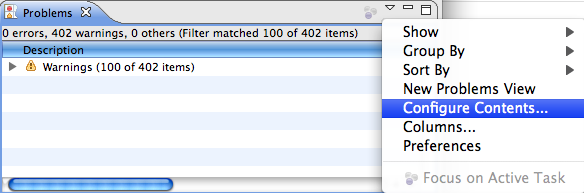
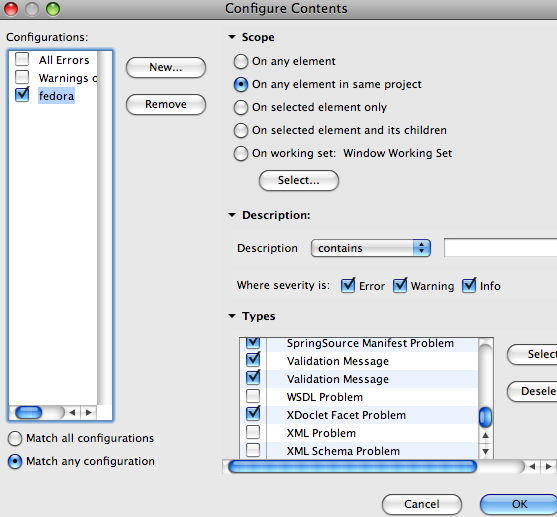
B) In the Problems view add a filter for warnings and errors. Use the
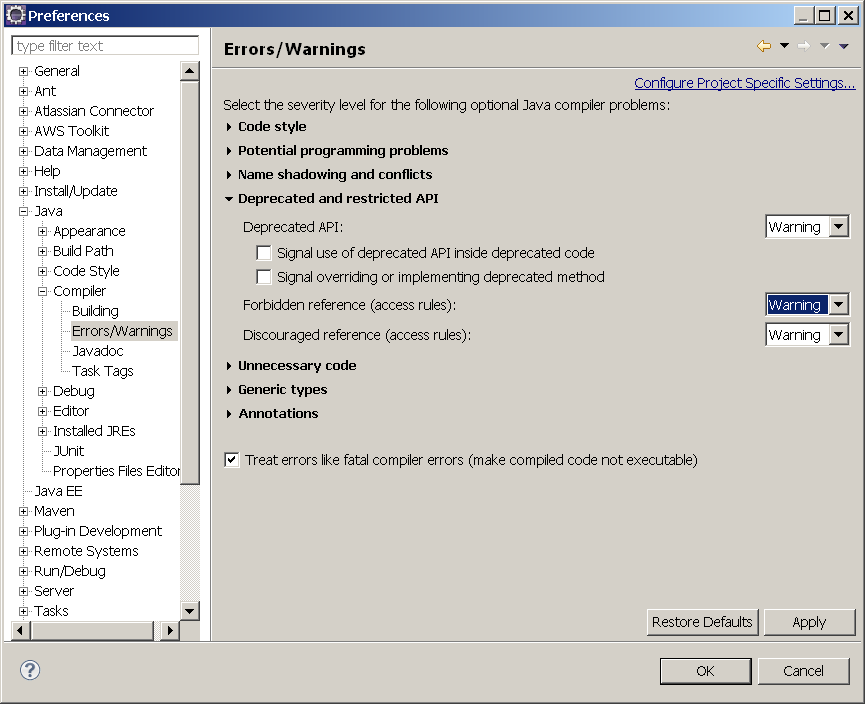
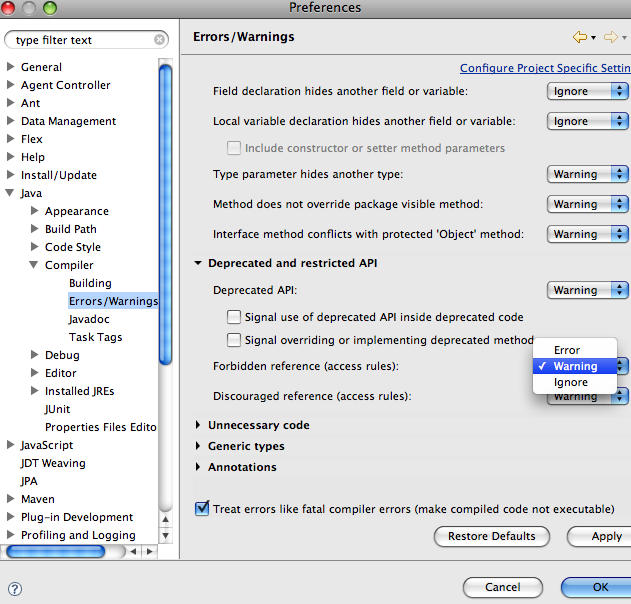
C) Use the Eclipse Menu: Window -> Preferences -> Java -> Compiler -> Errors/Warnings and open the
">Installing from the Command-Line
Known Issues
Related Materials[Building Fedora from Source Video] Eclipse with Maven notesThese are the steps I followed to get Fedora building correctly in Eclipse -- Eddie (6 Nov 2009) Tested with:
Known Issues
|