...
The following section will show you where to access forms in your Islandora installation, and how to clone and edit a form, and associate it with a content model. This section is for people who do not have knowledge of XpathXPath, and covers only minimal configuration options. If you are more familiar with XpathXPath, and XML, then we suggest that you go straight to the section on creating custom ingest forms, which provides a more technical overview of the interface, as well as information for creating elements.
...
| Info |
|---|
Don’t know what form you are trying to clone? Visit the details for your solution pack in this guide to determine the name of the default form. Additional information about creating new forms is available in Chapter 7 - Customizing Islandora
|
Once you have determined which form that you wish to clone, select it from the drop down menu In the list of available forms, find the form you want to clone and click “Copy.” On the next screen you will be prompted to give your new form a name:

Make sure your name is something that you will remember.
| Note |
|---|
| Form names must start with a letter or underscore and they can not cannot contain spaces or special characters. |
...
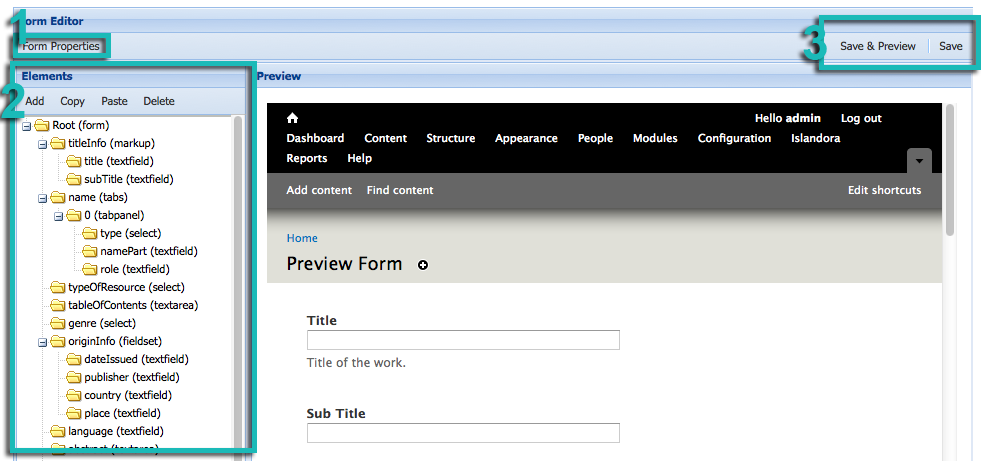
About the Form Builder Interface
- Select Under “Form Properties” to you can view the properties of your form.
- Under “Elements” you can view all of the fields you have created for your form, as well as make changes to those fields. Clicking on these elements an element name will allow you to view the way that each element will be created, read, updated, and deleted when you interact with the form, and the resulting metadata that the form will write.
- Click “Save” to save changes, and “Save and Preview” to save the changes and render the form in the preview screen.
If you wish to To create a form using a new schema, you will have to create a new form from scratch, or clone a form of the appropriate schema. This requires both knowledge of both XPath , and of the .xsd affiliated with that schema. If you wish to To create a new elementselement, you will also have to be familiar with XpathXPath.
However, there are several simple “tweaking” functions you can perform that do not require in-depth knowledge of Xpath XPath and your schema’s .xsd. For example, if you wish to can delete an element (one that is deemed unnecessary for a user to fill out on ingest) select by selecting the element with your cursor and click clicking “Delete.”
If Also, you wish to can change the label of a field, or populate the field with a default value (for example, if you want to pre-populate an author field for a author-specific collection) then you need to change the element’s properties. To do this, you would select the element, and be presented with configuration options for that element. by selecting the element and editing the element's configuration properties.
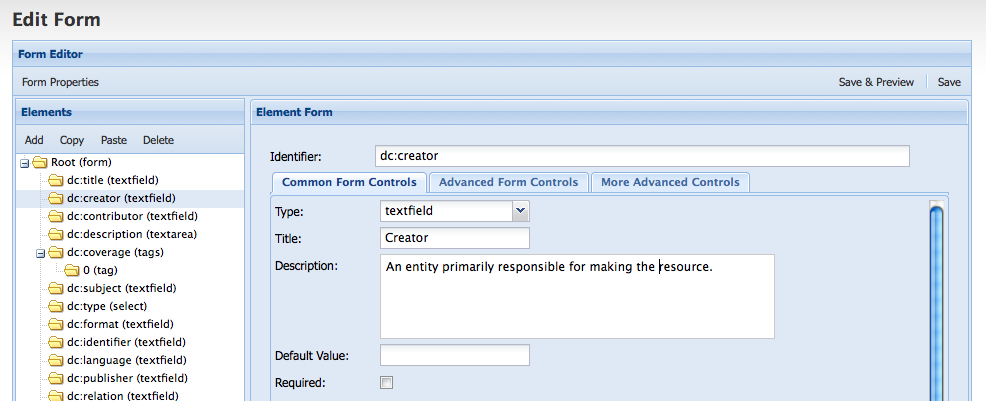
Here, I you can change the label presented to users see when interacting with this form field , by changing the value for the “Title” of the element. I You can also change the description that appears underneath the field, entry box by changing the text in the “Description” field. If I you want the field to be pre-populated with the creator’s name, I can also indicate enter the name in the “Default Value" field. In addition, if I you want to make this field mandatory for my you form, I can select the “Required” checkbox, and this field will appear with an asterisk, and the form users will not be able to be submitted submit this form without filling in this field. Once I you have made these changes, if I press click “Save and Preview,.” I You will be able to view the form as it will appear to my its users.

Here you can see I have changed the default “Creator” label has been changed to “Author” and have provided customized instructions for users appear below this field for my users. I have also . The Author field has been pre-populated the Author field with a name . This will to prevent unnecessary repetition for users ingesting items into this collection. However, the user can still edit this field on ingest if there is a case where the author’s name is different, the user can still edit this field on ingest.
Once you have tweaked this form, you will have to associate it with the appropriate content model in order for this form to appear as an option for users on ingest. To create an association between your new form and a content model, navigate back to Islandora > Form Builder (admin/islandora/xmlform) and select "Associate" on the form you wish to associate with a content model. You will see the following page:

At the top of the screen, you can see that all existing form associations are rendered. In order to fill In order to fill out this form appropriately, ensure that you are familiar with the details of your solution pack - particularly the name of the content model, and the name of the metadata stream it prescribes. If you are not sure, please review the Solution Pack documentation for your installed solution packs.
At the top of the screen, you can see that all existing form associations are listed.
Under "Content Model" begin Begin typing the PID of the content model you wish to affiliate associate a form with, and the name will auto-complete:
...
Under “Metadata Datastream ID” put in the DSID of the Datastream where your content model stores its rich metadata (not the DC Datastream). You must use the existing DSID prescribed in your content model (e.g., MODS, MARCXML, etc.), or this metadata will not appear in your collection objects. If you do not know what the correct DSID is for rich metadata in your content model, please review the documentation for the relevant content model. When you have entered the DSID for the Datastream where you want your form’s information to be stored, select the “Form Name” from the drop-down menu. , click "select" in the “Title Field.”
When you do this, you will notice that there is a change in the “Title Field” drop-down menu. Islandora populates this drop-down field with the elements in your form, so that you can choose which form you want to use element will serve as the source for the object’s label. Most of the time, you will likely want the object to appear with the label associated with a “Title” element.
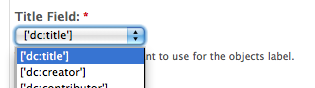 Image Removed
's label to come from the “Title” element. This label can be manually edited after ingest if ever necessary.
Select which field you would like to use for the object’s label.
Image Added
The next two options require a little bit more explanation:

When you select an xsl transform, you are selecting the transformation .xslt file that lslandora will use to crosswalk your metadata The "XSL Transform" file you choose is used by lslandora to crosswalk the schema of your rich metadata XML to Islandora’s default DC stream. This means that this will always be a .xsl that transforms your schema to DC. In this case, where you are cloning a form, you will want to select the default xsl for your content model. This information is provided in the Solution Pack section of your document. (For more information about Islandora’s use of .xslts, please review the “Islandora and Metadata” section of the guide. XSLT are called from a folder within islandora_content_model_forms (in the XML Forms modules). In this case, where you are cloning a form, you will want to select the default xsl for your content model. This information is provided in the Solution Pack section of your document. Forms modules).
The “Template Document” is a feature that allows you to submit a form with fields already completed. Usually, this will be a form that you have created by hand in an XML editor. It is not obligatory.
Click “Add Association.” Now, whenever you create an object in a collection that is affiliated associated with the content model you have used here, you will see your new form as an option to select in the drop down menu.
...
The following section presumes that you are using the Virtual Machine Image or are visiting http://sandbox.islandora.ca OR that you have installed and configured the XML Forms module, and that you have a basic knowledge of XpathXPath and understand metadata schemas. For an overview of how Islandora handles descriptive metadata, read Chapter 13 - Descriptive Metadata and Islandora. This section will discuss how to create a new form using the Islandora Form Builder.
...
The XML Forms Builder allows you to create and manipulate xml XML form templates and affiliate associate them with content models. This means allows you can to create custom forms for users to ingest items into collection by affiliating the content model with a form. You may want to create a custom metadata form to address the needs of your particular collection, or to pre-populate repeating fields. For example, if a collection of PDFs was all written by the same author, you may wish to create a custom form for this collection that has the author’s name pre-populated, so that users ingesting into this collection will not need to re-enter this information. Using custom forms you can also specify which metadata elements you wish to use to describe your object, and create validation rules for particular fields, among other features.
...
Before You Begin
Review and install the XML Form Builder module and its dependencies.
Metadata Schemas
Metadata schemas specify the XML Form Builder module and its dependencies.
Metadata Schmas
names and properties of elements that can be used in an XML file that is based on that schema.
When developing an XML form in the XML Form Builder you’ll need to reference the schema of the metadata format you are working with. Throughout this document we’ll be using the OAI DC metadata schema as an example. The OAI DC XML format is the serialization of Simple Dublin Core metadata descriptions and we’ll be using Dublin Core elements in this example. You can view/retrieve the schema from http://www.openarchives.org/OAI/2.0/oai_dc.xsd
Sample XML Record
It is incredibly helpful to have an example record on hand while developing the form. Ensure that it matches the version of the XML schema you are working with.
...
XML Editors
When developing a metadata form it can be useful to have an XML editor to test code in. Typically these editors can help you determine the xpath XPath of an element, whether the output you are producing is valid, etc. XML Editors dditors would include Oxygen oXygen (commerical), XPontus (opensource), and there are many others.
...
XML Form Builder is a Drupal module that integrates the creation of XML based forms into Islandora. Once a form has be been built, it is associated with a content model. This tutorial will take you through the process of creating a form, associating it with a content model, and implementing it with a collection. Once created you will be able to create and edit your metadata.
...
| Info |
|---|
The examples and screenshots below refer to an Islandora 6.x installation. The basic functions of the form builder are the same, although elements may look slightly different. |
To start creating a form selectclick "Create Form."
In the Create Form dialogue enter a form name - for example we are creating a basic OAI DC form so a name like oai_dc_basic would be appropriate. If you have an existing XML Form Builder form you could upload the form definition. We’ll be creating this OAI DC XML form from scratch, so we can click on "Create" without uploading a form definition.
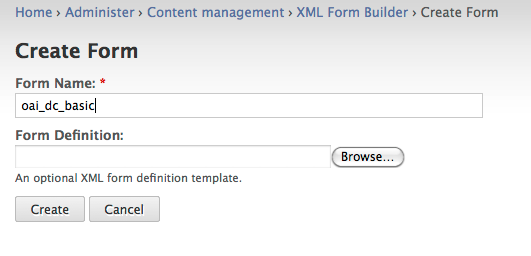
The module should report that it successfully created a new form called oai_dc_basic.
...
It provides information about the Root Element Name, the Namespace URI, the location of the Schema, as well as the various namespaces needed.

Select Click "Save" once you have the properties entered. Once the form properties have been entered saved you are ready to add elements fields to your form.
Adding form fields
Some schema require specify that elements appear in a certain order (an order-based schema), that certain elements be are required or not, that some only certain elements are repeatable and others not, or that whether and how elements can be nested. Refer to your schema documentation and to the any guidance it offers in the creation of records based on the schema. For In the schema we are using in this tutorial, Simple Dublin Core, each of the fifteen elements is optional and may be repeated, but no nesting is allowed. We will create a simple form for this exercise that utilizes several Dublin Core elements. Let’s create a table listing the elementselement names, the element form field labels, the type types of elementform fields, the content of the elementelements, and whether they are repeatable. We’ll use this information when adding elements fields to our form.
Element | Label | Type | Content | Repeatable |
title | Title | textfield | The title of the work. | no |
creator | Creator(s) | tags/tag | The creator(s) of the work. | yes |
description | Description | textarea | A description of the work. | no |
type | Type | select | A controlled list of terms | no |
date | Date | datepicker | The date the work was issued or published. | no |
subject | Subject(s) | tags/tag | The topic of the work. | yes |
rights | Rights | textarea | Information about rights held in and over the resource. | no |
...
Adding a textfield type form field - the dc:title element
We can start adding elements to the form starting with the title element. We can use the information in our table to fill out the first part of "Element Form" pane. We can start with the title element.
In this part of the form you can enter values for Identifier, Type, Title, Description, Default Value, and Required. These can be defined as follows:
Identifier: Identifies An ID for this form field. It is the Drupal form array key for this element. Typically you would just enter the name of the element you are describing.
Type: Used to determine the type of form field. The form field type for this field (textfield, textarea, select, etc.)
Title: The label of the form field as it appears on your form. Typically you would just enter the name of the element you are describing.
Description: The description of the form fieldelement that this Element Form is about.
Default Value: The value of the form field that will be displayed to be display or selected initially for this element if the form has not been submitted yet.
Required: Indicates whether or not the element is required. This automatically validates for empty fields, and flags inputs as required. Fields with a type Type of "file" are not allowed to be required.
...
The rest of the form deals with where each element is created, read, updated, and deleted in the XML tree. This is where it would be useful to understand how XML works and to have a basic understanding of XPATHXPath.
Reviewing our OAI DC XML sample record we can determine the location/context of the title element.
| Code Block |
|---|
|
<oai_dc:dc xmlns:oai_dc="http://www.openarchives.org/OAI/2.0/oai_dc/"
xmlns:dc="http://purl.org/dc/elements/1.1/"
xmlns:xsi="http://www.w3.org/2001/XMLSchema-instance"
xsi:schemaLocation="http://www.openarchives.org/OAI/2.0/oai_dc/
[http://www.openarchives.org/OAI/2.0/oai_dc.xsd]">
<dc:title>Pioneer days & shanty ways</dc:title> |
The full XPATH XPath in this XML document for the dc:title element would be:
| Code Block |
|---|
/oai_dc:dc/dc:title |
where /oai_dc:dc is the parent element and dc:title is the child element. The Create dialogue is where we enter the information needed for creating an element in our form. We’ll be entering information into the Path Context, Path, Type, and Value properties in our example. If you had an order-based schema, you would also fill in the Schema field. Here are some definitions for each of those properties:
Path Context: the context in at which the path XPath action with be executed in.
...
- the XPath query is run from the root element of the document
- parent -
...
- the XPath query is run from the node created/read by its parent’s form field
- self - only applies to Delete and Update actions and applies to the node selected by the Read action.
Path: An XPATH XPath to this element’s parent object. This is used to determine whether where this element is inserted.
Schema: An XPATH XPath to the definition of this element's parent. The xpath XPath is executed in the schema defined in this form's properties. This is used to determine the insert order for this element.
Type: The type of node that will be created. If XML is specified, an XML snipped snippet is expected in the value Value field.
Value: If the type Type is either Element or Attribute, "element" or "attribute," the name of the element or attribute is expected here. If the type Type is "XML," an XML snippet is expected in which %value% indicates where the value of the form field will be inserted where ever the string %value% is used in the XML snippet.
Review the image below and think about how your other OAI DC elements will be created based on this pattern.
...
Adding a textarea type form field - the dc:description element
For element The "textarea type" of form field should be used for elements that require a description or that contain a large amount of text, the textarea type form field is used.

Adding a select type form field - the dc:type element
...
1. When adding information about the element we will use the same method that we have used previously.

2. To add terms to your select form field you need to , click on the "More Advanced Controls" tab in the "Element Form" pane. Review the image below and enter your terms in the Options panel.

Adding a datepicker type form field - the dc:date element
...
Once the association has been successfully created, you can try ingesting new objects into a collection that has the islandora:sp_strict_pdf content model associated with it. In this caseAlternatively, access the Islandora demo VM which has a PDF collection associated with the islandora:sp_strict_pdf content model. Navigate to the PDF collection using the image as a guide and try creating new PDF objects there.

Once in the collection (you can tell where you are by the breadcrumb), select the Add tab to add a new PDF to the collection.
...