
VIVO Documentation
Old Release
This documentation relates to an old version of VIVO, version 1.11.x.
Looking for another version? See all documentation.
When the profile page for an individual is created, it includes the standard header and footer, but most of the content is built by the Freemarker template individual.ftl.
Sometimes you would prefer for a particular class of individuals to have a particular style of profile page.For example, you want the contact information for a foaf:Person to appear right below their picture. Or you want to see a link to their co-investigator network near the top of the page.
VIVO lets you specify different templates for different classes of individuals. The standard distribution includes three of those specifications. Here are examples of profile pages for a Person, and Organization, and a Concept, with and without specified templates.
| specified template | default template | |
|---|---|---|
| Person |  | 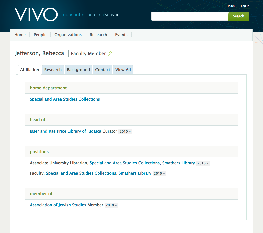 |
| Organization |  |  |
| Concept | 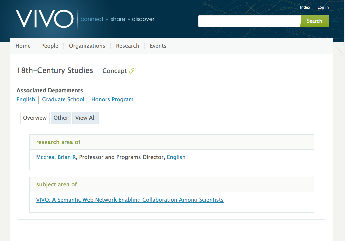 | 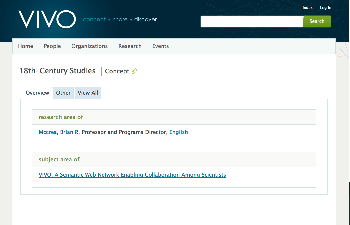 |
A specified profile template applies to individuals of the specified class, and to individuals of all sub-classes. So a page specified for foaf:Person will also apply to its sub-classes, like vivo:FacultyMember.
There is no page in VIVO that will allow you to set or change these template specifications. Here are two ways to set it up.
When you start an empty VIVO instance for the first time, it will load the files in the rdf/tbox/firsttime directory into the asserted-tbox model.
The file initialTBoxAnnotations.n3, in this directory, contains the triples that specify these profile templates. They are scattered in the file, and mingled with other triples, but if you look, you can find these statements:
foaf:Organization
      vitro:customDisplayViewAnnot
              "individual--foaf-organization.ftl"^^xsd:string .
foaf:Person
      vitro:customDisplayViewAnnot
              "individual--foaf-person.ftl"^^xsd:string .
skos:Concept
      vitro:customDisplayViewAnnot
              "individual--skos-concept.ftl"^^xsd:string .
You can remove triples from this file prior to the first startup of VIVO, or add triples to create other template specifications.
If VIVO has already been started, the files in rdf/tbox/firsttime will not be read again. You can use the advanced data tools on the Site Administrator's page to make changes.
@prefix bibo:    <http://purl.org/ontology/bibo/> .
@prefix vitro:   <http://vitro.mannlib.cornell.edu/ns/vitro/0.7#> .
@prefix xsd:     <http://www.w3.org/2001/XMLSchema#> .

bibo:Article
      vitro:customDisplayViewAnnot
              "individual--bibo-article.ftl"^^xsd:string .
Site Admin pageSite Admin page, under Advanced Data Tools, choose Ingest tools.Add/Remove RDF data is tempting, but it does not allow us to load into a specific model.Ingest Menu page, choose Manage Jena Models.http://vitro.mannlib.cornell.edu/default/asserted-tbox, and choose load RDF data.Load RDF Data page, use the Browse control to locate your RDF file, and select the type of RDF format you used. Click the Load Data button.
If there is a problem with the load, you will see a screen that shows an error message. Unfortunately, if the load is successful, you will see no indication. You will simply be returned to the list of available models.
You must restart VIVO to see the effect of your changes.
Site Admin page.Site Admin page, under Advanced Data Tools, choose Add/Remove RDF data.Add or Remove RDF Data page, use the Browse control to locate your RDF file, choose to remove mixed RDF, and select the type of RDF format you used. Click the submit button.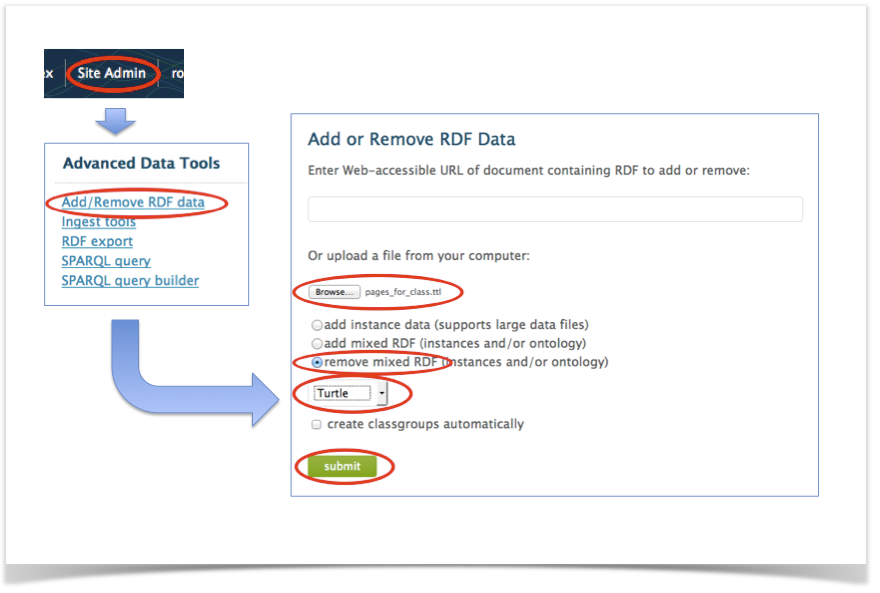
If there is a problem with your data file, you will see a screen showing an error message. If the removal is successful, you will see a message like the following:

Note that the message tells you how many triples you asked to have removed, without regard to whether they actually existed in the data model.
You must restart VIVO to see the effect of your changes.
There is no direct way to replace triples in the data model. Use the preceding steps to remove the triples you don't want, and to add new triples to replace them.
Expert VIVO users will be aware of many other ways of adding or removing triples.
Remember that VIVO must be restarted, since the list of specific templates is created at startup.
All content on the LYRASIS Wiki is licensed under the CC BY (Attribution) license![]() , unless otherwise noted.
, unless otherwise noted.