Contribute to the DSpace Development Fund
The newly established DSpace Development Fund supports the development of new features prioritized by DSpace Governance. For a list of planned features see the fund wiki page.
An E Person is a user in DSpace who can be assigned various rights to perform activities or manage content access in the repository.
This section provides details about various methods to create or update an E Person in DSpace. For example, DSpace allows users to self-register. In addition, users with administrative rights can create and update E Person in the system. Both methods are explained in the latter part of this document.
Audience
- Repository Administrator
- Community Administrator
- Collection Administrator
- Base User
Add E Person – Self Registration
Step 1: Go to DSpace’s home page and click on the “Log In” link appearing at the top right corner of the screen, and the pop-up will open, as illustrated below screen.

Step 2: Click on the New User to add an E Person in DSpace.

Step 3: Enter the user’s Email ID who needs to be registered as E Person in DSpace and click on the Register button.

Step 4: After clicking the register button, an email will be sent to the user’s email id, and the user will be redirected to the home page. This E Mail will go from the communication mail ID registered in the DSpace instance.

Step 5: Click on the unique registration link received in the email to continue with the registration process. Suppose your email client or server security settings do not show hyperlinks. In that case, you can copy the link and paste it into your browser.

Step 6: Enter a password of your choice and re-enter the same password. Followed by this, click on the “Submit Password” button to complete the registration process.

Add E Person – Registration by Administrator
This process is for the user having System, Community, and Collection Administrator rights. Only users with these rights can manage E People.
Step 1: Go to DSpace’s home page and click on the “Log In” link appearing at the top right corner of the screen, and the pop-up will open, as illustrated below screen.
Step 2: Enter your user id and password and click on the login button for logging in to DSpace

Step 3: Users with administrative rights will see the admin menu on the left-hand side of the screen, as shown below illustration.

Step 4: Rollover your cursor over the administration menu and click on Access control. Click on the People link to go to the EPeople module.

Step 5: Click on the “Add EPerson” button for initiating the E-Person creation process.

Step 6: Enter “First Name”, “Last Name,” and “E-Mail”. Select the “Can log in” check box for enabling id to login into the DSpace.

Step 7: Upon populating values in mandatory fields “Save” button will get activated. Click on the Save button to complete the process.
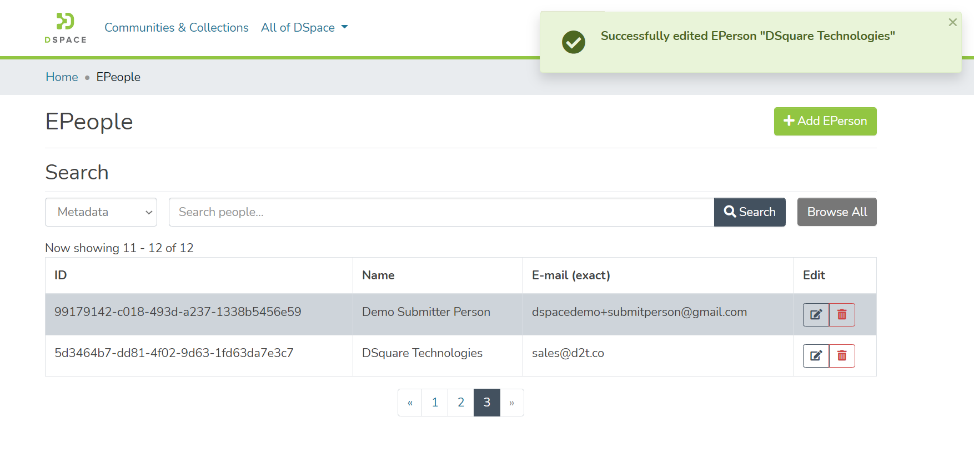
Step 8: Upon successfully adding EPerson in DSpace, you will see a success prompt on the screen.

Step 9: The administrator can inform the user to generate its password using forgot password mechanism. The same is explained in the following steps.
Step 10: The user to go to the home page of DSpace and click on the “Log In” link appearing at the top right corner of the screen and pop up will open, as illustrated below screen.
Step 11: Click on the “Have you forgotten your password?” password link reset page.

Step 12: Enter the Email ID used for Eperson creation in the DSpace and click on the “Save” button.

Step 13: A prompt confirming a password reset link dispatch to the registered email id will appear and the user will be redirected to the home page. This E Mail will go from the communication mail ID registered in the DSpace instance.
Step 14: Click on the unique registration link received in the email to continue the password reset process. Suppose the user’s email client or server security settings do not show hyperlinks. In that case, the user can copy the link and paste it into its browser.
Step 15: Enter a password of your choice and re-enter the same password. Followed by this, click on the “Submit Password” button to complete the password generation process.
Update an Eperson
Eperson updates can be performed by users having System, Community, and Collection Administrator rights. These users can perform the following activities:
- Update Eperson details
- Manage Eperson Log in
- Impersonate Eperson
- Manage user groups membership
- Delete Eperson from DSpace
Update an Eperson – Update details & Manage Log in
Step 1: Go to DSpace’s home page and click on the “Log In” link appearing at the top right corner of the screen, and the pop-up will open, as illustrated below screen.
Step 2: Enter your user id and password and click on the login button for logging in to DSpace.
Step 3: Users with administrative rights will see the admin menu on the left-hand side of the screen, as shown below illustration.
Step 4: Rollover your cursor over the administration menu and click on Access control. Click on the People link to go to the EPeople module.
Step 5: Scroll or search the eperson’s name in the epeople list.
Step 6: Epeople table has the following elements:
- ID – Unique ID generated in DSpace for each Eperson
- Name – Full name of Eperson as entered during registration
- Email – Email id used for registering user
- Edit – Buttons showing various actions available for Eperson management. It has “Edit” and “Delete buttons. Click on the “Edit” button if you want to edit details of the Eperson, or click on the “Delete” button if you want to delete Eperson from DSpace permanently.

Step 7: Click on the “Edit” button to continue with Eperson editing.

Step 8: You can make the following updates on the Edit Eperson page
- Update Eperson details – You can update First Name, Last Name, and Email ID as the user’s identification details.
- Enable/Disable User Login – Uncheck this option to disable the user’s login into the DSpace without deleting it. This option is helpful for scenarios where users need to be disabled from logging in and performing specific actions temporarily.
- Requires Certificate – Configure this option if a certificate is to be used for the login.
- Reset Password – Password can be reset for Eperson using this option. A Password field should be present for utilizing this option.
- Impersonate Eperson – The user with rights to Impersonate EPerson can impersonate the selected Eperson and perform all activities that the Eperson is entitled to.
- Delete Eperson – Using this option, Eperson can be deleted permanently from DSpace
- Update User group(s) – This button allows the administrator to add selected Eperson to multiple user groups.
You can make options # 1 to 3 and click on Save for updating the Eperson record.

Step 9: Upon successful execution of the update, you will notice a success prompt on the screen.
Update an Eperson – Manage user groups membership
Step 10: Click on the “Add to group” button to initiate the process of adding selected Eperson to a user group.

Step 11: Please click on the “Edit” button next to the user group you want to select for this Eperson.

Step 12: Enter the eperson’s name or any other metadata value in the search field to find the target user.

Step 13: You will see Epeople appearing as a result of a search made. Click on the + button appearing next to Eperson you want to add to this group.

Step 14: Upon successfully adding Eperson to the group, a success prompt will appear on the screen, and Eperson will appear in the Current Members list of the group.

Step 15: You will see this group on the profile page of Eperson as well.

Update an Eperson – Delete Eperson
Step 16: Click the “Delete Eperson” button if you want to delete Eperson from DSpace permanently.

Step 17: DSpace will show you a confirmation prompt to re-confirm your decision of deleting the selected Eperson. Click on “Delete” if you want to continue with the deletion, or click on “Cancel” if you want to cancel the deletion.

Step 18: Successful deletion of the user will be confirmed by displaying a success promptly. You will be redirected to the Epeople page.

Overview
Content Tools
All content on the LYRASIS Wiki is licensed under the CC BY (Attribution) license![]() , unless otherwise noted.
, unless otherwise noted.
1 Comment
Julia Gilmore
Regarding: Eperson updates can be performed by users having System, Community, and Collection Administrator rights. These users can perform the following activities:
3. Impersonate a User
Our understanding was only repository admin can impersonate a user, based on the Managing User Accounts page in the DSpace documentation:
# Required to use"Impersonate EPerson"feature# When enabled, a full Administrator can impersonate any other non-Administrative userwebui.user.assumelogin =true