You can find more information about SAML authentication and its communication flow in the SAML Authentication article.
The instructions given below are based on version 3.0.12 of the Circulation Manager. Currently, the Circulation Manager supports only SAML version 2.0 or greater. As of this writing, successful implementations have been tested with the following single-sign-on products:
- Shibboleth (version x.x)
- Microsoft ADFS (version x.x)
Description of Data Required for Configuration
SAML-based authentication for patrons requires certain configuration to be set up to work correctly. Configuration parameters are described in the Table I.
Table I. SAML Authentication Provider Configuration
Parameter Name | Mandatory | Description |
Service Provider’s XML metadata | Yes | SAML metadata of the Circulation Manager's Service Provider in an XML format. MUST contain exactly one SPSSODescriptor tag with at least one AssertionConsumerService tag with Binding attribute set to urn:oasis:names:tc:SAML:2.0:bindings:HTTP-POST. |
Service Provider’s private key | No | Private key used for encrypting and signing SAML requests |
Identity Provider’s XML metadata | Yes | SAML metadata of Identity Providers in an XML format. MAY contain multiple IDPSSODescriptor tags but each of them MUST contain at least one SingleSignOnService tag with Binding attribute set to urn:oasis:names:tc:SAML:2.0:bindings:HTTP-Redirect. |
Internal signing secret for OAuth and SAML bearer tokens | No | Secret used for signing Bearer tokens issued by SAML authentication provider and used by client applications to confirm their authentication status |
Generating the Required Service Provider Data
Since the Circulation Manager acts as the SAML Service Provider, you must create an XML document with the appropriate service information included. If you are new to SAML, it will be easiest to use tools provided by OneLogin, Inc., to create the required XML data. The instructions below provide information needed by the tools, and show how to generate the Service Provider XML metadata you will need to create the SAML configuration in Configuring a SAML Patron Authentication Integration below. The steps included have been demonstrated to work in one instance; however, a couple of values and the placement of the X.509 certificate value may need to change in other circumstances. Two of the OneLogin SAML Tools are important in building the Circulation Manager's SP metadata document:
While the Service Provider private key described above is optional, we highly recommend–and the SAML Identity Provider may require–that the SAML requests from the Circulation Manager be signed. So we will begin by creating a self-signed X.509 certificate (public key) to be included in your Service Provider metadata document. If you will not be using a certificate for signing requests, you can skip section A below, and go straight to section B.
Last, in addition to the Service Provider metadata, you will also need an XML document describing access to the Identity Provider's system. However, that document will have data that must come from the organization operating the Identity provider (perhaps a third-party to the library). If possible, obtain a copy of the provider's Identity Provider XML metadata document. If you must create your own (and you receive the requisite data from the provider), OneLogin also provides a tool to generate the IdP document: Build IdP Metadata. For the configuration steps below, we assume you will get the Identity Provider XML metadata document direct from the provider.
A. Generate a Self-Signed Certificate
To begin, you will need an X.509 certificate. This could be a commercially obtained certificate. However, in our limited experience, a self-signed certificate will be acceptable. We will use OneLogin's online form to create a basic cert. They do provide a warning related to the security of information you supply. For most implementations, the online generator provides sufficient security; however, if security is a major concern for your Circulation Manager implementation, you should create the certificate separately, on a local computer. Instructions to create a certificate are available from many sources; one example (chosen fairly randomly, but with good information) is Creating a Self-Signed X.509 Certificate.
- Go to the Generate Self-Signed Cert online form
B. Build SP XML File
(in progress)
C. Caveat: Using an SSL-Protected Domain
Although not part of the SAML communication chain itself, you may find that an Identity Provider requires that communication with your Circulation Manager use the HTTPS protocol (SSL enabled). As a matter of production practice, your Circulation Manager should already use an SSL certificate and be configured to use HTTPS. However, if you happen to be setting up a test service to work out the details of this SAML integration, you may need to add an SSL/HTTPS configuration to your Circulation Manager. That process is beyond the scope of this document.
Configuring a SAML Patron Authentication Integration
To set up a new SAML authentication provider in Circulation Manager, follow the steps below.
- Login to the Circulation Manager interface as usual
- Click the Patron Authentication item in the left sidebar
- Click Create new patron authentication service
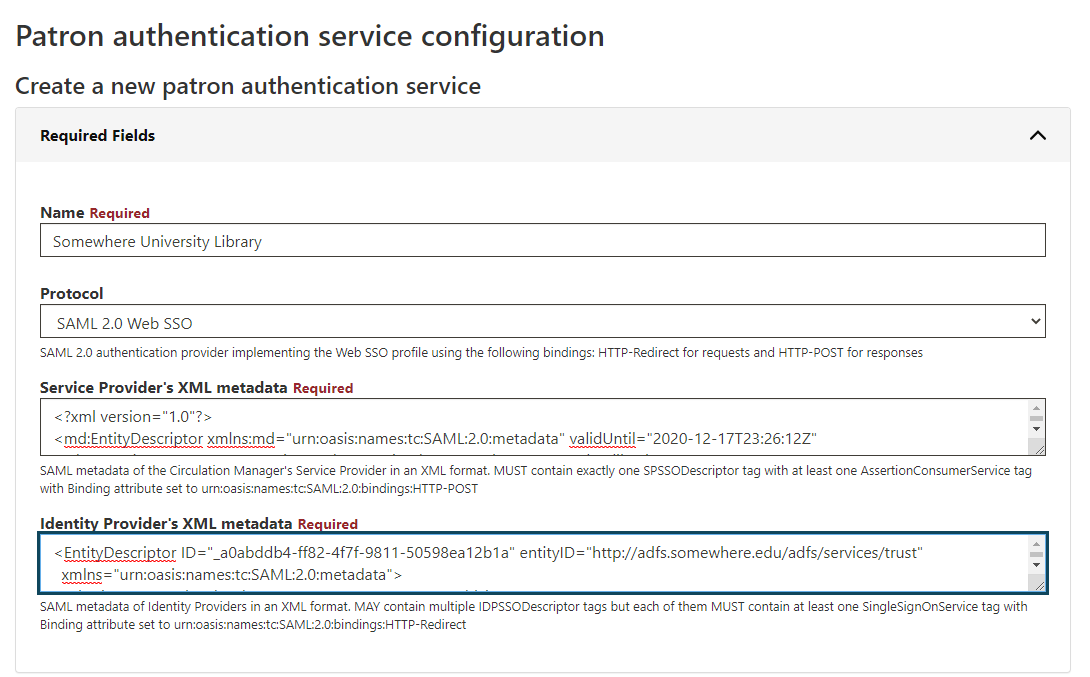
- Enter a name for the integration, probably with the library name to which it connects; for example, Somewhere University Library
- Select the SAML 2.0 Web SSO item from the Protocol drop down field

- Copy the XML document text shown at the bottom of the Build SP Metadata page from Section B above into a text editor
- Delete the first KeyDescriptor block and the use parameter of the second one, shown in red below:

- This will give the final XML document below:

- Copy and paste this XML document into the Service Provider's XML metadata field, as shown below

- Copy the text of the XML document you received for the Identity Provider's service
- Paste the text into the Identity Provider's XML metadata field, as shown below
- Copy the text from the Private Key for sign the metadata field in the Build SP Metadata page from Section B above
- Click the Optional Fields bar
- Paste the private key text you have copied into the Service Provider's private key field, as shown below
- (image goes here)
- If desired for initial debugging, you can turn on Debug mode by entering the numeral 1 into the Service Provider's debug mode field.
- To assign a library to this integration, click the Libraries bar
- Click the drop-down menu for the Add Library field
- Select the library name for which the SAML integration will be used
- Review the configuration fields and click the Submit button to save the SAML integration
Troubleshooting
(coming soon)