Introduction
The Image Gallery is an easily deployable "app" for viewing images stored within DuraCloud from the convenience of your browser (desktop or mobile browser). The image gallery allows you to organize your images into multiple "collections" within a DuraCloud space and will then automatically display thumbnails of a image collection in a grid view. Each image in the thumbnail display will have its name presented with it. When a thumbnail is clicked an enlarged version of the thumbnail will be shown in the foreground with navigation controls for viewing the previous and next image in the collection (swipe navigation for mobile devices). When viewing the large image the viewer provides the ability to zoom the image in and out simply by scrolling and panning around the image by moving your mouse.
The role-based access controls of DuraCloud are applied to viewing images within spaces, to ensure images are only viewed by authorized users. Spaces which are set to public access will be available for viewing through the image gallery without the need to provide credentials.
The image gallery is comprised of only html, javascript, and css files. It is completely browser based and self contained. It uses some of the latest web development technologies including HTML5, hardware accelerated CSS3 transitions and animations, responsive design to recognize the screen resolution being displayed on and adjust the layout of the components accordingly (desktop and mobile friendly using Bootstrap), and jQuery javascript library.
Please note that the Image Gallery is still considered to be in Beta. Please help us to improve this feature by providing feedback and reporting any issues that you may come across. Thanks for helping to make DuraCloud better!
Download
The Image Gallery code is available from GitHub
Installing the Image Gallery
After downloading the image gallery files, simply copy them into a new space within your DuraCloud account. It makes sense to name this space something similar to "image-gallery", but the name you choose is up to you.
That's it! The DuraCloud image gallery is now installed and ready to use. If you copied the files into a space named "image-gallery" simply open up your browser and load the page:
https://myaccount.duracloud.org/durastore/image-gallery/index.html (replace "myaccount" with the subdomain for your DuraCloud account)
Initial Setup
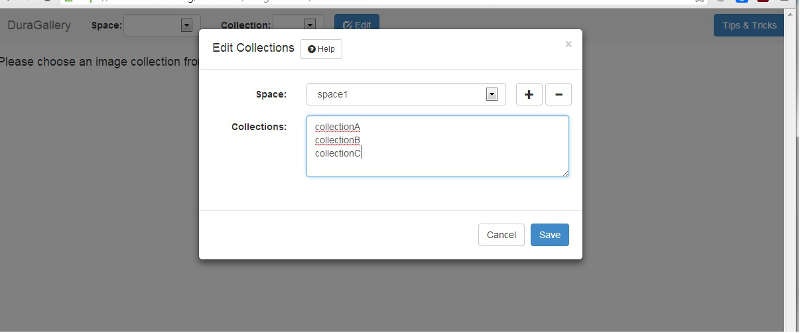
Your first visit to your newly installed image gallery will require that you setup which of your DuraCloud spaces contain image collections that you will want to view through the image gallery (your "Space" dropdown menu will be empty). To setup your image gallery spaces and collections simply click the "Edit" button at the top of the screen next to the "Collection" dropdown menu. You will be presented with a window containing controls for adding/removing spaces to your "Space" dropdown menu. When you select a space from this window you will be shown the image collection names setup for that space in the textarea below the "Space" dropdown menu. First add a space and then simply type the image collection names in that space into the textarea, one collection per line.
This however requires that you already have your images organized in DuraCloud using the below predefined naming structure (the collection and image names can be anything, but you must use "thumbs" prefix for your thumbnails, "previews" prefix for your enlarged images, and if storing your original high resolution images use the "highres" prefix):
- collectionA/thumbs/img1.jpg
- collectionA/thumbs/img2.jpg
- collectionA/previews/img1.jpg
- collectionA/previews/img2.jpg
- collectionA/highres/img1.jpg
- collectionA/highres/img2.jpg
- collectionB/thumbs/img1.jpg
- collectionB/thumbs/img2.jpg
- collectionB/previews/img1.jpg
- collectionB/previews/img2.jpg
- collectionB/highres/img1.jpg
- collectionB/highres/img2.jpg
- collectionC/thumbs/img1.jpg
- collectionC/thumbs/img2.jpg
- collectionC/previews/img1.jpg
- collectionC/previews/img2.jpg
- collectionC/highres/img1.jpg
- collectionC/highres/img2.jpg
*Note: The images in a collection can have any name, but each image stored at different resolutions (thumbs, previews, and highres) must have the same name. Also, the two required resolutions are "thumbs" and "previews". It is optional if you want to store the original full resolution "highres" version of your images.
So, if the above images were organized into "collectionA", "collectionB", and "collectionC" within a DuraCloud space named "space1" then your setup window would look something like this:
Using the Image Gallery
When the page is loaded the available spaces and image collections are retrieved and loaded into the dropdown menu. Selecting a space and collection from the dropdown menus will trigger the thumbnails in that collection to be loaded.
The thumbnails are displayed in a grid with the name of each image underneath its thumbnail. Clicking a thumbnail will load a larger version of the image in the foreground.
When viewing an enlarged thumbnail:
- The enlarged image can be zoomed in and out by scrolling on it (mousewheel or trackpad).
- A zoomed in image can be panned around by moving the mouse around.
- Navigating to the next/previous image can be done by clicking the left or right arrows on either side of the screen or by pressing the left or right arrow keys on the keyboard.
- You can exit from viewing the enlarged image display by clicking the 'X' at the top-right corner of the screen or by pressing the "Esc" or "x" key on the keyboard.
- Clicking the content ID link below the blown up image loads the high-res jpg in a new browser tab/window.
On a mobile device just swipe left/right to navigate to the previous/next image when viewing the enlarged images.
Image Gallery FAQ
Q: I like the Image Gallery, but I'd like to make a small change, how can I do that?
A: The Image Gallery functionality is completely managed by the JavaScript and CSS files that you added to your space. Simply update those files, and the UI will change.
Q: I made some cool changes, and would like to contribute them back, can I do that?
A: Absolutely! The best way to do this is to add a pull request with your code changes through the Github project.
