...
Obviously, to do this you will need to have Eclipse Installed: http://www.eclipse.org/![]()
This HOW-TO has been written using Eclipse 3.4 (Ganymede), but it is also known to work in Eclipse 3.3 as well. The information here probably works with other versions of Eclipse, but no guarantees are made.
...
After you have installed all of these plugins, or in-between each one, you will need to restart the Eclipse workspace
Install the SVN
...
Plugin
Subversion (
...
SVN) enables you to checkout the DSpace source code and keep up-to-date with the latest changes to the platform from DSpace Repository.
Eclipse >= 3.5:
In Eclipse select "Help --> Install New Software...". 
In the drop down list select "Helios - http://download.eclipse.org/release/helios![]() ."
." 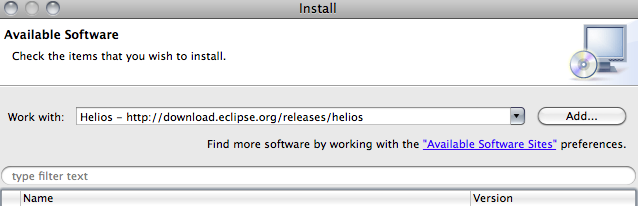
From the list select "Collaboration --> Subversive SVN Team Provider" 
Click the "Next >" button and follow the dialogs to install the plugins.
Restart Eclipse.
Eclipse ask you which Subversive Connector you want to use. Choose SVN Kit or JavaHL.
Eclipse < 3.5:
There are 2 popular SVN plugins for Eclipse. You only need to install one of them:
- SubVersive Install Instructions: http://www.eclipse.org/subversive/downloads.php

- SubClipse Install Instructions: http://subclipse.tigris.org/install.html
You should install the most recent version of your preferred client. The recommendation is SubVersive (as it is an Eclipse Incubation project), and the remainder of this tutorial assumes that this is the one you are using.
...
Install the most recent version of the plugin, which is available for download from:
http://www.eclipsetotale.com/tomcatPlugin.html![]()
Unfortunately, there is no remote URL location for the sysdeo plugin. You will have to manually download the plugin and unzip it into the eclipse/plugins directory. Also, you will need to have Tomcat installed locally. Obtain the latest version of Tomcat from: http://jakarta.apache.org/tomcat![]()
Maven 2 Plugin (required for DSpace 1.5)
...
Prerequisite: Before installing the Maven 2 Plugin for Eclipse, you must install Apache Maven from http://maven.apache.org/![]()
Install the most recent version of the plugin using the below remote URL.
Remote URL: http://m2eclipse.sonatype.org/update/![]()
Web Standard Tools (optional)
...
- Download the DSpace's Coding Conventions config file: dspace-eclipse-format.xml\
- Install either as workspace default or for your individual DSpace project(s).
- (Workspace Default) Select Window -> Preferences in Eclipse. Go to the Java -> Code Style -> Formatter. Click the "Import..." button and select the file.
- (Individual Project) Right click on the DSpace project, select Properties. Go to the Java -> Code Style -> Formatter. Click the "Import..." button and select the file.
...
- Open the SVN Repository Exploring Perspective by using Window -> Open Perspective -> Other -> SVN Repository Exploring
- Right click in the "SVN Repository" View on the left, and use: New -> Repository Location
- Enter the location of the DSpace SVN repository: https://dspace.svn.sourceforge.net/svnroot/dspace
"Access restriction: The type DataSource is not accessible due to restriction on required library <jre_path>/lib/rt.jar"
...
| Wiki Markup |
|---|
_NEEDS UPDATING -- Not sure this actually works\! \[15 Apr 2008\]_ |
Checking out DSpace as a Tomcat Project
...
You should now find the DSpace deployed; try the following URL to see if it is working correctly:
http://localhost:8080/dspace-svn![]()
Note that due to the limitations of the 1.4.x source structure, it is only possible to view one web application at a time from the same project when deployed within Eclipse. To work on the web interface and the OAI interface simultaneously you must use DSpace 1.5 and follow the instructions below. Otherwise, it is possible to modify this HOW-TO so that the OAI interface is deployed in Tomcat rather than the usual web interface.
...
dspace- The root module, which builds all of DSpace and holds the DSpace configurationsdspace-api- The DSpace API module, which contains all the primary business logic (Java code)dspace-jspui- The JSP-based User Interface for DSpacedspace-xmlui- The XML-based User Interface for DSpace (also known as Manakin)dspace-xmlui-api- The primary API for the XML-UI for DSpace (including all Aspect Java code)dspace-xmlui-wing- The Digital Repository Interface (DRI) API for XML-UIdspace-xmlui-webapp- The XML-UI web application configurations (including all Aspect & Theme definitions)
dspace-oai- The OAI-PMH interface for DSpacedspace-lni- The Lightweight Network Interface (LNI) for DSpacedspace-lni-core- The primary API for LNIdspace-lni-client- The client API for LNI (along with a simple sample client)dspace-lni-webapp- The LNI web application configurations
Wiki Markup {{dspace-sword}} \- The SWORD \[interface for DSpace
dspace-sword-api- The SWORD APIdspace-sword-webapp- The SWORD web application
language-packs- The Internalization (I18N) language packs for DSpace (Currently JSP-UI only - the I18N for Manakin is in thedspace-xmlui-webappmodule)pom.xml- The Maven module, which contains the primary Maven configurations to build DSpace
...
- Select File -> New... -> Project in Eclipse
- Select SVN -> Projects from SVN and click "Next"
- Select to "Use an existing repository" and choose the DSpace SourceForge repository (https://dspace.svn.sourceforge.net/svnroot/dspace)
- Select the version of DSpace you want to checkout, likely either under "tags" (e.g. tags -> dspace-1_5) or "branches" (e.g. branches -> dspace-1_5_x). Click "Next"
- Choose "Check Out as Project with the name specified". Give it a name (e.g.
dspace-1_5_x), and click "Finish". Eclipse will then checkout the DSpace 1.5 source code from SVN. - Return to the "Java Perspective" in Eclipse ("Window -> Open Perspective -> Java"). You should see your newly created project in the Package Explorer.
- Right-Click on your project and select "Maven -> Enable Dependency Management". Eclipse will now read the Maven
pom.xmlconfiguration file and auto-configure your project as a "Java Project"! - Right-Click again, and select "Maven -> Enable Nested Modules". This tells Maven Eclipse plugin that your project contains several nested sub-modules within it.
- Right-Click one last time, and select "Maven -> Update Source Folders" ("Maven -> Download Sources" for Eclipse 3.2.0). Eclipse will now automatically locate all the DSpace Java source code, as well as all the 3rd party JAR dependencies.
...
- First, we will checkout DSpace 1.5 from SVN. You must perform the checkout into a location that is not under your Eclipse workspace folder. Therefore, if you perform an SVN checkout using Eclipse, you must move that folder to another location before you can proceed.
- (e.g.)
svn cohttps://dspace.svn.sourceforge.net/svnroot/dspace/branches/dspace-1_5_xdspace-1_5_x-src - NOTE: Make sure that you checkout DSpace 1.5 to a "stable" location (i.e. not to a temporary directory like
/tmp). During the next step (when you will import the DSpace modules into Eclipse), Eclipse will not copy the code into your Eclipse workspace. Rather, it will just reference the location where you have checked out DSpace 1.5 via SVN...so, this location will (in a sense) become your DSpace 1.5 "workspace". - ADDITIONAL NOTE: This requirement to checkout DSpace 1.5 to a folder not in your Eclipse workspace unfortunately seems to be a limitation of the
m2eclipseMaven plugin for Eclipse. If you attempt to re-import Maven projects which already exist in your Eclipse workspace, you will end up with a bunch of empty project folders.
- (e.g.)
- Next, we will point Eclipse at the location where you checked out DSpace 1.5 to, and tell Eclipse to import it as a series of Maven Projects
- Select File -> Import in Eclipse
- Select General -> Maven Projects as the type of source. Click "Next".
- Browse to the location where you just checked out DSpace 1.5
- Eclipse will automatically parse out all the various Maven projects which are located there (based on the location of the Maven
pom.xmlfile in each DSpace module). It will display a list of all DSpace modules & sub-modules, and allow you to check which ones you wish to import. If you don't want to import all the modules at this time, you can always go back and repeat this same process to checkout additional modules. - It is*highly recommended to always select the top-level
pom.xml, since this is the module which builds DSpace. - It is also*recommended to uncheck any sub-modules of
dspace-xmluiordspace-lni(e.g.dspace-xmlui-apiis a submodule ofdspace-xmlui). This will decrease the number of separate DSpace projects in your Eclipse workspace.- You may choose to uncheck any DSpace modules you are not planning on working with. For example, if you don't want to work with the DSpace LNI, then uncheck all of its modules (
dspace-lni,dspace-lni-core,dspace-lni-client,dspace-lni-webapp). As mentioned, you can always repeat this process to import the DSpace LNI code if you need to, afterall.
- You may choose to uncheck any DSpace modules you are not planning on working with. For example, if you don't want to work with the DSpace LNI, then uncheck all of its modules (
- After you have selected the DSpace modules you wish to work with, click "Next". Eclipse will now create the number of DSpace projects you selected, and auto-identify those projects which contain Java code as Java Projects. It will also locate all the 3rd party JAR dependencies for each project and add them automatically to your project's classpath.
- You should now have separate Eclipse projects for your various DSpace modules. Important: You'll notice that Eclipse did not move this code into your normal Eclipse workspace. Rather, Eclipse is just referencing those folders whereever you originally checked them out via SVN.
...
You should now find the web interface deployed; try one of the following URLs to see if they are working:
http://localhost:8080/dspace-jspui![]() (JSP-UI)
(JSP-UI)
http://localhost:8080/dspace-oai/request?verb=Identify![]() (OAI-PMH)
(OAI-PMH)
http://localhost:8080/dspace-xmlui![]() (XML-UI)
(XML-UI)
Viewing the Database in Eclipse
...