...
During major DSpace version changes, the schema usually changes too. This page details the procedure to update the schema and generate the image to be included in documentation as part of the release procedure.
Connect to database
- menu Project -> New Project Connected to Database (Ctrl-N)
- Rdbms: Postgres
- Fill in Host name, Port, User, Password, Database name
- Connect
- Select the "public" schema
- A default layout will be generated
Add tables to groups
- Right-click on empty background and choose "Create group of tables" from the context menu
- Fill in group name as per key below (hierarchy, items, ...)
- Check "Override Tables Header Color"
- Click on color picker, RGB tab, fill in Color Code as per key below (ECE3C3, C3ECE3, ...), click OK
- Back in "New group" dialog, include tables from "Tables In No Group" to "Current Group Tables" as per key below
- Click OK
...
| Code Block |
|---|
| title | Group: identifiers Color: C4E0F9 |
|---|
|
handle
doi |
Rearrange groups and tables
Keep the main hierarchy horizontal (community, collection, item, bundle, bitstream and their mappings)
Export
- Project -> Export as... -> PNG Image
- Crop excessive white background in an image editor
- optipng -o9 dspace5.png
Examples
Example exported image:
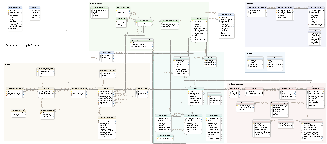
DSpace 5 schema in DbSchema's editable .dbs format: dspace5.dbs