...
Parameter Name | Mandatory | Description |
Service Provider’s XML metadata | Yes | SAML metadata of the Circulation Manager's Service Provider in an XML format. MUST contain exactly one SPSSODescriptor tag with at least one AssertionConsumerService tag with Binding attribute set to urn:oasis:names:tc:SAML:2.0:bindings:HTTP-POST. |
Service Provider’s private key | No | Private key used for encrypting and signing SAML requests. |
Identity Provider’s XML metadata | Yes | SAML metadata of Identity Providers in an XML format. MAY contain multiple IDPSSODescriptor tags but each of them MUST contain at least one SingleSignOnService tag with Binding attribute set to urn:oasis:names:tc:SAML:2.0:bindings:HTTP-Redirect. |
Internal signing secret for OAuth and SAML bearer tokens | No | Secret It's a sitewide configuration setting residing in on Sitewide Settings page and containing the secret used for signing Bearer tokens issued by SAML authentication provider and used by client applications to confirm their authentication status. |
Anchor create_sp_data create_sp_data
Generating the Required Service Provider Data
| create_sp_data | |
| create_sp_data |
...
- Go to the Generate Self-Signed Cert online form
B. Build SP XML File
(in progress)SP XML file can be built using OneLogin SAML Developer Tools.
C. Caveat: Using an SSL-Protected Domain
...
- Login to the Circulation Manager interface as usual
- Click the Patron Authentication item in the left sidebar
- Click Create new patron authentication service
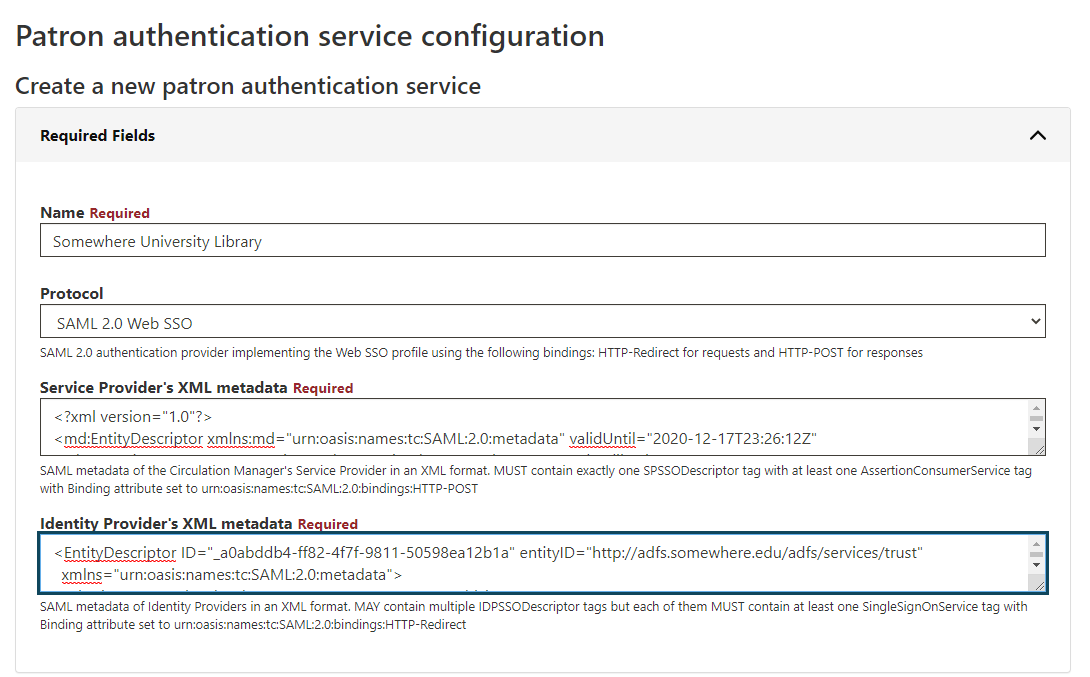
- Enter a name for the integration, probably with the library name to which it connects; for example, Somewhere University Library
- Select the SAML 2.0 Web SSO item from the Protocol drop down field

Configure SP SAML Metadata
- Copy the XML document text shown at the bottom of the Build SP Metadata page from Section B above into a text editor
- Delete the first KeyDescriptor block and the use parameter of the second one, shown in red below:
...
- Copy and paste this XML document into the Service Provider's XML metadatafield, as shown below

- Copy the text of the XML document you received for the Identity Provider's service
- Paste the text into the Identity Provider's XML metadata field, as shown below
- Copy the text from the Private Key for sign the metadata field in the Build SP Metadata page from Section B above
- Click the Optional Fields bar
- Paste the private key text you have copied into the Service Provider's private key field, as shown below
- (image goes here)
Configure IdP SAML Metadata
Circulation Manager supports two different types of SAML IdPs:
- Independent IdPs that are not a part of any SAML federation. In this case, you can use the IdP metadata in an XML format.
- Federated IdPs. Currently, only the InCommon Federation is supported, but support for other federations can also be added in the future.
Configure Independent IdP SAML Metadata
- Copy the text of the XML document you received for the Identity Provider's service
- Paste the text into the Identity Provider's XML metadata field, as shown below
| Info |
|---|
Please note that Circulation Manager supports multiple IdPs, and the XML may contain multiple IDPSSODescriptor tags, each containing SAML metadata of a specific IdP. |
Configure Federated IdP SAML Metadata
- Select desired IdPs from the dropdown, as it's shown in the picture below.

Final Steps
- If desired for initial debugging, you can turn on Debug mode by entering the numeral 1 into the Service Provider's debug mode field.
- To assign a library to this integration, click the Libraries bar
- Click the drop-down menu for the Add Library field
- Select the library name for which the SAML integration will be used
- Review the configuration fields and click the Submit button to save the SAML integration
...