All Versions
- DSpace 7.x (Current Release)
- DSpace 8.x (Unreleased)
- DSpace 6.x (EOL)
- DSpace 5.x (EOL)
- More Versions...
Contribute to the DSpace Development Fund
The newly established DSpace Development Fund supports the development of new features prioritized by DSpace Governance. For a list of planned features see the fund wiki page.
DSpace has a set of command line tools for importing and exporting items in batches, using the DSpace Simple Archive Format. Apart from the offered functionality, these tools serve as an example for users who aim to implement their own item importer.
The basic concept behind the DSpace's Simple Archive Format is to create an archive, which is a directory containing one subdirectory per item. Each item directory contains a file for the item's descriptive metadata, and the files that make up the item.
archive_directory/
    item_000/
        dublin_core.xml         -- qualified Dublin Core metadata for metadata fields belonging to the 'dc' schema.
        metadata_[prefix].xml   -- metadata in another schema.  The prefix is the name of the schema as registered with the metadata registry.
        contents                -- text file containing one line per filename.
		collections				-- (Optional) text file that contains the handles of the collections the item will belong to. Each handle in a row.
								-- Collection in first line will be the owning collection.
		handle					-- contains the handle assigned/to be assigned to this resource
        relationships           -- (Optional) If importing Entities, you can specify one or more relationships to create on import
        file_1.doc              -- files to be added as bitstreams to the item.
        file_2.pdf
    item_001/
        dublin_core.xml
        contents
        file_1.png
        ...
The dublin_core.xml or metadata_[prefix].xml file has the following format, where each metadata element has its own entry within a <dcvalue> tagset. There are currently three tag attributes available in the <dcvalue> tagset:
element - the Dublin Core elementqualifier - the element's qualifierlanguage - (optional) ISO language code for element
<dublin_core>
    <dcvalue element="title" qualifier="none">A Tale of Two Cities</dcvalue>
    <dcvalue element="date" qualifier="issued">1990</dcvalue>
    <dcvalue element="title" qualifier="alternative" language="fr">J'aime les Printemps</dcvalue>
</dublin_core>
(Note the optional language tag attribute which notifies the system that the optional title is in French.)
When providing urls as values for fields that contain the ampersand (&) symbol, the ampersands in these urls have to be encoded as &
Every metadata field used, must be registered via the metadata registry of the DSpace instance first. See Metadata and Bitstream Format Registries.
Recommended Metadata
It is recommended to minimally provide "dc.title" and, where applicable, "dc.date.issued". Obviously you can (and should) provide much more detailed metadata about the Item. For more information see: Metadata Recommendations.
The contents file simply enumerates, one file per line, the bitstream file names. See the following example:
file_1.doc
file_2.pdf
license
Please notice that the license is optional, and if you wish to have one included, you can place the file in the .../item_001/ directory, for example.
The bitstream name may optionally be followed by any of the following:
\tbundle:BUNDLENAME\tpermissions:PERMISSIONS\tdescription:DESCRIPTION\tprimary:trueWhere '\t' is the tab character.
'BUNDLENAME' is the name of the bundle to which the bitstream should be added. Without specifying the bundle, items will go into the default bundle, ORIGINAL.
'PERMISSIONS' is text with the following format: -[r|w] 'group name'
'DESCRIPTION' is text of the files description.
Primary is used to specify the primary bitstream.
Supported in 7.2 or above for 'import' only
The IIIF metadata feature was added in 7.2 and is only supported on import ('add' mode) of an SAF package.
For IIIF enabled items, the bitstream name may optionally be followed by any of the following:
\tiiif-label:IIIFLABEL\tiiif-toc:IIIFTOC\tiiif-width:IIIFWIDTH\tiiif-height:IIIFHEIGHTWhere:
'IIIFLABEL' is the label that will be used for the image in the viewer.
'IIIFTOC' is the label that will be used for a table of contents entry in the viewer.
'IIIFWIDTH' is the image width that will be used for the IIIF canvas.
'IIIFHEIGHT' is the image height that will be used for the IIIF canvas.
Supported in 7.1 or above for 'import' only.
The optional relationships file enumerates the relationships of this Entity to other Entities (either already in the system, or also specified in your SAF import batch). This allows entities to be linked to new or existing entities during import. Entities can be linked to other entities in this import set by referring to their import subfolder name. Because relationships can only be created for Entities, it can only be used when importing Configurable Entities.
Each line in the file contains a relationship type key and an item identifier in the following format:
relation.<relation_key> <handle|uuid|folderName:import_item_folder|schema.element[.qualifier]:value>
The input_item_folder should refer the folder name of another item in this import batch. Example:
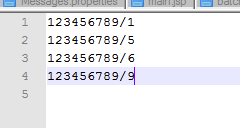
relation.isAuthorOfPublication 5dace143-1238-4b4f-affb-ed559f9254bb
relation.isAuthorOfPublication 123456789/1123
relation.isOrgUnitOfPublication folderName:item_001
relation.isProjectOfPublication project.identifier.id:123
relation.isProjectOfPublication project.identifier.name:A Name with Spaces
During initial import, new items are stored in a map keyed by the item folder name. Once the initial import is complete, a second pass checks for a 'relationships' manifest file in each folder and creates a relationship of the specified type to the specified item.
Don't forget Entities require a "dspace.entity.type" metadata field
Remember, if you are creating new Entities via an SAF package, those Entities MUST specify a "dspace.entity.type" metadata field. Because this metadata field is in the "dspace" schema, it MUST be specified in a "metadata_dspace.xml", similar to:
<dublin_core schema="dspace">
  <dcvalue element="entity" qualifier="type">Publication</dcvalue>
</dublin_core>
Relationships to existing Entities can also be created via metadata_relation.xml
If you already know the UUID of an existing Entity that you want to relate to, you can also create/update the "metadata_relation.xml" file to add/update the relationship, similar to:
<dublin_core schema="relation">
  <dcvalue element="isAuthorOfPublication">5dace143-1238-4b4f-affb-ed559f9254bb</dcvalue>
</dublin_core>
The "relationships" file is primarily for creating relationships between Entities in the same import batch. Of course, you can also choose to use the "relationships" file to create new relationships to existing Entities instead of creating/updating the "metadata_relation.xml" file. The main advantage of the "metadata_relation.xml" file is that it is used both on export and import, while the "relationships" file is only used on import at this time.
metadata_[prefix].xml for a Different SchemaIt is possible to use other Schema such as EAD, VRA Core, etc. Make sure you have defined the new schema in the DSpace Metadata Schema Registry.
metadata_[prefix].xml, where the [prefix] is replaced with the schema's prefix.<dublin_core> element include the attribute schema=[prefix].Here is an example for ETD metadata, which would be in the file metadata_etd.xml:
<dublin_core schema="etd">
     <dcvalue element="degree" qualifier="department">Computer Science</dcvalue>
     <dcvalue element="degree" qualifier="level">Masters</dcvalue>
     <dcvalue element="degree" qualifier="grantor">Michigan Institute of Technology</dcvalue>
</dublin_core>
Before running the item importer over items previously exported from a DSpace instance, please first refer to Transferring Items Between DSpace Instances.
Command used: |
|
Java class: |
|
Arguments short and (long) forms: | Description |
| Add items to DSpace ‡ |
| Replace items listed in mapfile ‡ |
| Delete items listed in mapfile ‡ |
| Source of the items (directory) |
| Destination Collection by its Handle or database ID |
| Where the mapfile for items can be found (name and directory) |
| Email of eperson doing the importing |
| Send submission through collection's workflow |
| Kicks off the email alerting of the item(s) has(have) been imported |
| Test run‚ do not actually import items |
| Apply the collection template |
| Resume a failed import (Used on Add only) |
| Command help |
| Name of zipfile |
‡ These are mutually exclusive.
The item importer is able to batch import unlimited numbers of items for a particular collection using a very simple CLI command and 'arguments'.
To add items to a collection, you gather the following information:
[dspace]/bin/dspace import --add --eperson=joe@user.com --collection=CollectionID --source=items_dir --mapfile=mapfile
or by using the short form:
[dspace]/bin/dspace import -a -e joe@user.com -c CollectionID -s items_dir -m mapfile
The above command would cycle through the archive directory's items, import them, and then generate a map file which stores the mapping of item directories to item handles. SAVE THIS MAP FILE. You can use it for replacing or deleting (unimporting) the mapped items.
Testing. You can add --validate (or -v) to the command to simulate the entire import process without actually doing the import. This is extremely useful for verifying your import files before doing the actual import.
To add items to a collection, you gather the following information:
[dspace]/bin/dspace import --add --eperson=joe@user.com --collection=CollectionID --source=zipfile_dir --zip=filename.zip --mapfile=mapfile
or by using the short form:
[dspace]/bin/dspace import -a -e joe@user.com -c CollectionID -s zipfile_dir -z filename.zip -m mapfile
The above command would unpack the zipfile, cycle through the archive directory's items, import them, and then generate a map file which stores the mapping of item directories to item handles. SAVE THIS MAP FILE. You can use it for replacing or deleting (unimporting) the mapped items.
Testing. You can add --validate (or -v) to the command to simulate the entire import process without actually doing the import. This is extremely useful for verifying your import files before doing the actual import.
Replacing existing items is relatively easy. Remember that mapfile you saved above? Now you will use it. The command (in short form):
[dspace]/bin/dspace import -r -e joe@user.com -c collectionID -s items_dir -m mapfile
Long form:
[dspace]/bin/dspace import --replace --eperson=joe@user.com --collection=collectionID --source=items_dire --mapfile=mapfile
If you wish to replace content using a Zipfile, that's also possible. The command is similar. But, in this situation "-s" refers to the directory of the zip file, and "-z" gives the name of the zipfile:
[dspace]/bin/dspace import -r -e joe@user.com -c collectionID -s zipfile_dir -z filename.zip -m mapfile
You are able to unimport or delete items provided you have the mapfile. Remember that mapfile you saved above? The command is (in short form):
[dspace]/bin/dspace import -e joe@user.com -d -m mapfile
In long form:
[dspace]/bin/dspace import --eperson=joe@user.com --delete --mapfile mapfile
--workflow (-w) argument will route the imported items through the workflow system.--template (-p) argument.--resume (-R) flag to resume the import where you left off after you fix the error.Specifying the owning collection on a per-item basis from the command line administration tool
If you omit the -c flag, which is otherwise mandatory, the ItemImporter searches for a file named "collections" in each item directory. This file should contain a list of collections, one per line, specified either by their handle, or by their internal db id. The ItemImporter then will put the item in each of the specified collections. The owning collection is the collection specified in the first line of the collections file.
If both the -c flag is specified and the collections file exists in the item directory, the ItemImporter will ignore the collections file and will put the item in the collection specified on the command line.
Since the collections file can differ between item directories, this gives you more fine-grained control of the process of batch adding items to collections.
Available in DSpace 7.4 and above.
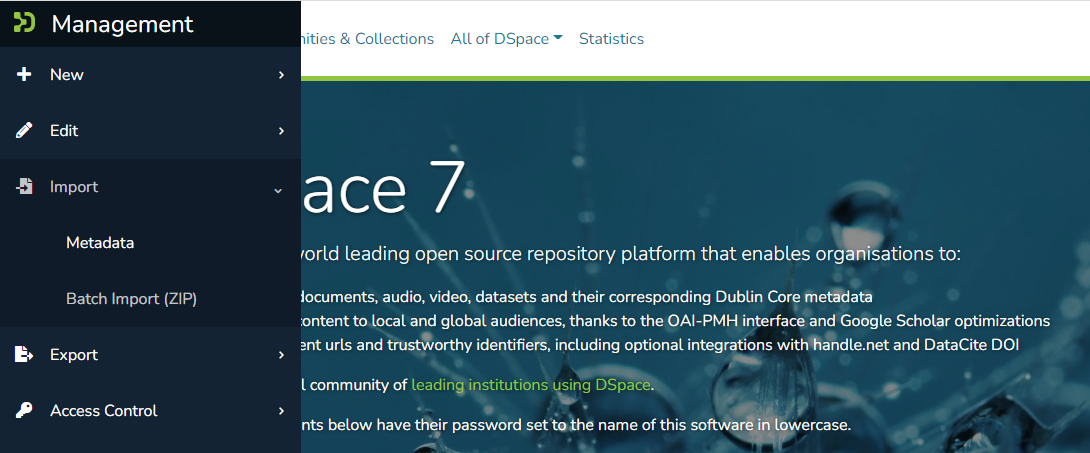
Batch import can also take place via the Administrator's UI. The steps to follow are:
A. Prepare the data
B. Import the items via the UI
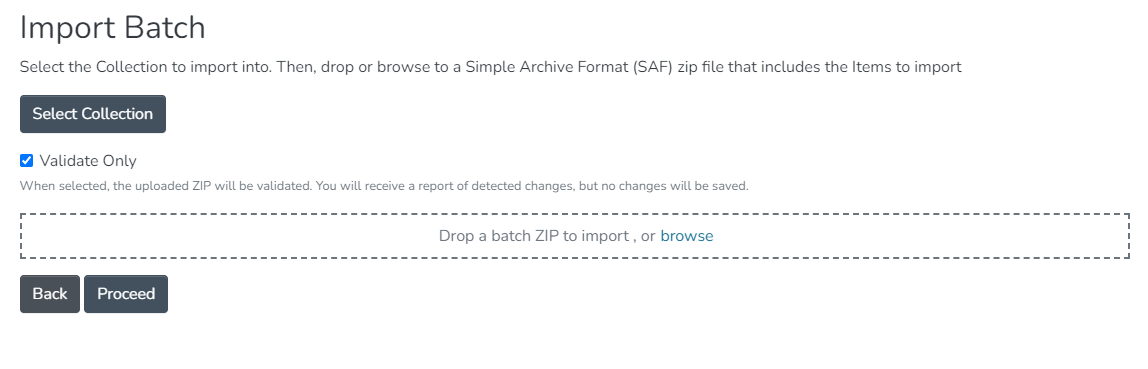
Clicking "Proceed" will start the Batch Import. This creates a new "Process" which begins the upload of the batch. Depending on the size of the batch, this process may take some time to complete. You can refresh to page to see the current status, or go back to the list of processes ("Processes" menu in sidebar) to check on its status. Once the process is COMPLETED, you will see a log of the results and a mapfile (which can be used to make later updates).
It is also possible to start an "import" directly from the "Processes" menu. This allows you to specify additional options/flags which are normally only available to the command-line "import" tool (see documentation above).
The item exporter can export a single item or a collection of items, and creates a DSpace simple archive in the aforementioned format for each exported item. The items are exported in a sequential order in which they are retrieved from the database. As a consequence, the sequence numbers of the item subdirectories (item_000, item_001) are not related to DSpace handle or item IDs.
Command used: |
|
Java class: | org.dspace.app.itemexport.ItemExport |
Arguments short and (long) forms: | Description |
| Type of export. COLLECTION will inform the program you want the whole collection. ITEM will be only the specific item. (You will actually key in the keywords in all caps. See examples below.) |
| The ID or Handle of the Collection or Item to export. |
| The destination path where you want the file of items to be placed. |
| Sequence number to begin with. Whatever number you give, this will be the name of the first directory created for your export. The layout of the export directory is the same as the layout used for import. |
| Export the item/collection for migration. This will remove the handle and any other metadata that will be re-created in the new instance of DSpace. |
| -x or --exclude-bitstreams | Do not export bitstreams. See the usage scenario below. |
| Brief Help. |
Exporting a Collection
The CLI command to export the items of a collection:
[dspace]/bin/dspace export --type=COLLECTION --id=collectionID_or_handle --dest=/path/to/destination --number=seq_num
Short form:
[dspace]/bin/dspace export -t COLLECTION -i collectionID_or_handle -d /path/to/destination -n seq_num
The keyword COLLECTION means that you intend to export an entire collection. The ID can either be the database ID or the handle. The exporter will begin numbering the simple archives with the sequence number that you supply.
Exporting a Single Item
To export a single item use the keyword ITEM and give the item ID as an argument:
[dspace]/bin/dspace export --type=ITEM --id=itemID_or_handle --dest=/path/to/destination --number=seq_num
Short form:
[dspace]/bin/dspace export -t ITEM -i itemID_or_handle -d /path/to/destination -n seq_num
Each exported item will have an additional file in its directory, named "handle". This will contain the handle that was assigned to the item, and this file will be read by the importer so that items exported and then imported to another machine will retain the item's original handle.
The
-m
Argument
Using the -m argument will export the item/collection and also perform the migration step. It will perform the same process that the next section Exchanging Content Between Repositories performs. We recommend that section to be read in conjunction with this flag being used.
The -x Argument
Using the -x argument will do the standard export except for the bitstreams which will not be exported. If you have full SAF without bitstreams and you have the bitstreams archive (which might have been imported into DSpace earlier) somewhere near, you could symlink original archive files into SAF directories and have an exported collection which almost doesn't occupy any space but otherwise is identical to the exported collection (i.e. could be imported into DSpace). In case of huge collections -x mode might be substantially faster than full export.
Available in DSpace 7.4 and above.
Batch export can also take place via the Administrator's UI. The default file size upload limit is 512MB, and is being configured in the spring boot application.properties file.
The steps to follow are:
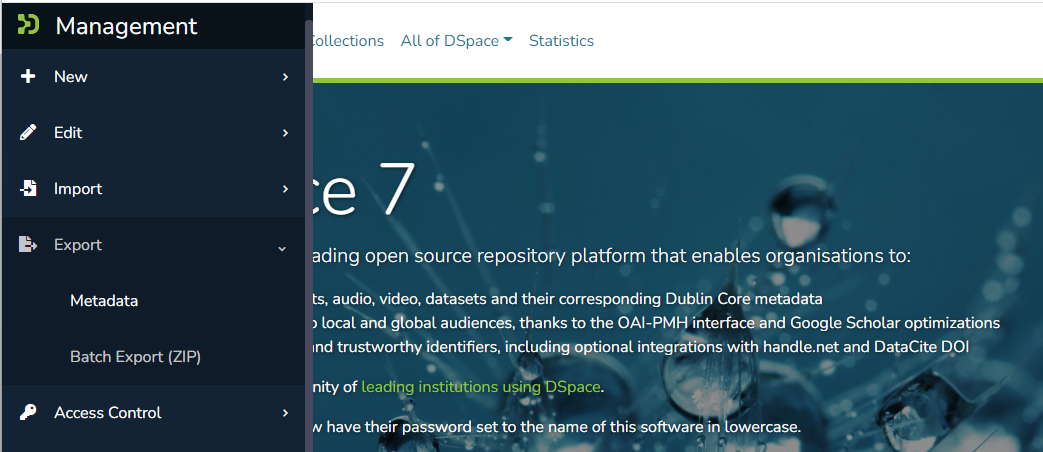
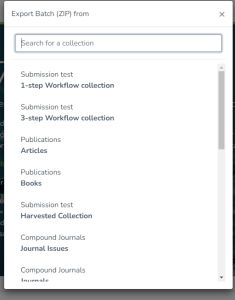
It is also possible to start an "export" directly from the "Processes" menu. This allows you to specify additional options/flags which are normally only available from the command-line "export" tool (see documentation above). It also allows you to export a single Item.
All content on the LYRASIS Wiki is licensed under the CC BY (Attribution) license![]() , unless otherwise noted.
, unless otherwise noted.
2 Comments
Francesco Pio Scognamiglio
For the import functionality the
collectionsfile can contain also UUIDs, not only handles.For the export functionality is missing the documentation of the export in zip format (
-zoption).Bram Luyten (Atmire)
From what we can see, the process cleaner doesn't seem to clean the files in /dspace/imports for failed SAF imports. We have created https://github.com/DSpace/DSpace/issues/8759 to follow up on this.